Configuring the Device
1. Ensure you are using a compatible Easy-on PC device and that it is connected to your computer.
2. Create a GDT folder on the root of the Easy-on PC install drive, for example X:\GDT (where 'X' is the drive your Easy-on PC software is installed).
3. Setup
the Easy on-PC software to use the connected device. To do this:
a) Run the Easy on-PC software.
b) Select Utilities > Configuration > Device tab.
c) Select the correct COM Port and click the Auto Detect button.
d) Ensure Status fields are complete.
4. Configure
Easy on-PC to use GDT connection:
a) Click EMR tab.
b) Configure as follows:
i) Selected EMR System – GDT
ii) GDT settings –
GDT
folder: Easy on-PC install drive + GDT (Browse to folder created
in Step 2. above.)
GDT
ID: MD
Tick
- Export each measurement parameter separately.
Tick
- Close application when done
Tick
- Attach Report and select PDF
c) Click OK to confirm.
5. Exit the Easy on-PC software.
Performing a Test in Clinical
1. Select
Tools > Tool
Box > Respiratory Function
from the patient's record. The Respiratory
tab appears.
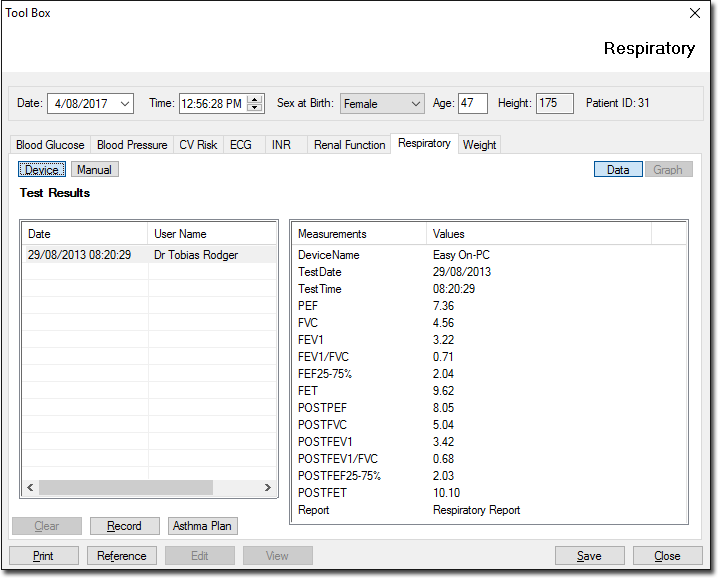
2. Click
 to
use the Easy-On PC Spirometer device to record values.
to
use the Easy-On PC Spirometer device to record values.
3. Click
 The
Available Spirometer Machines window is displayed if more than
one device is installed. Select the device you wish to use from
this window.
The
Available Spirometer Machines window is displayed if more than
one device is installed. Select the device you wish to use from
this window.
4. The Easy-on PC software window appears.
5. The Edit Patient Data window appears. Ensure that this is the correct patient record you wish to work with. If not begin the process again. If the patient record is correct, click the Perform Test button. Easy-On PC spirometer reports of tests created via the Clinical Tool Box can be accessed via the View button. These PDFs are also accessible via the Correspondence tab in the patient's record.