In most consultations, prescriptions are printed immediately and given directly to the patient. In some instances it may not be practical, possible and/or desirable to print at that time. For example, you may wish to write the regular scripts for all the patients in a nursing home and print them at the end of the visit, or you may be using a computer without a printer attached, such as a laptop. To account for this it is possible to store scripts in a batch, for printing later.
Adding a Prescription to the Batch
1. Prescribe in the normal fashion, but do not print the script(s) immediately. Instead, close the patient's record, and on doing so you will be prompted as to whether you want to print the scripts you have written.
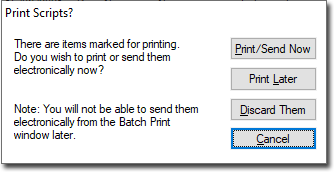
2. Click  to add the script(s) to the batch. This action also closes the patient's record.
Printing the Batch
1. From the Clinical front screen either:
o Select Clinical > Prescription > Batch Print, or
o Press F9
2. The Batch Print Manager appears, listing all stored prescription items.

o Click Print to print the complete batch of prescriptions. Once printed, the prescription is remove from the batch list and a record of the script is added to the patient's medication list.
o Click Delete to delete a prescription from the list. This will not be added to the patient's record.
o Click  to filter the list of prescriptions by practitioner, patient or date as indicated in the following image.

Select the appropriate filter parameters and click  The Batch Print Manager list changes to display only the matching prescriptions.