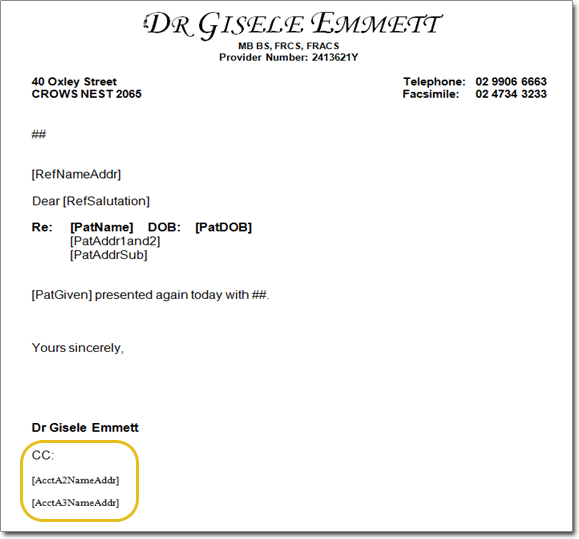
One of the most frequently asked questions is “Can the patient’s GP and/or Specialist be carbon-copied (CC’d) into a letter?” The answer is yes - letter templates can be setup to automatically generate a CC field.
The initial setup is a four-step process, and once the account contacts and WP fields have been specified, creating a letter is quick and easy for the typist, providing a more efficient workflow and better tracking within the patient’s record.
The following steps are required:
1. Setup Account Contacts
2. Setup Template/WP Fields
3. Create a Patient Account
4. Typing the Letter
As a typist responsible only for composing patient letters, you need only consider step 4 – Typing the Letter.
Note: Bluechip has the functionality to setup many specific WP fields within templates if required.
Step 1 - Setup Account Contacts
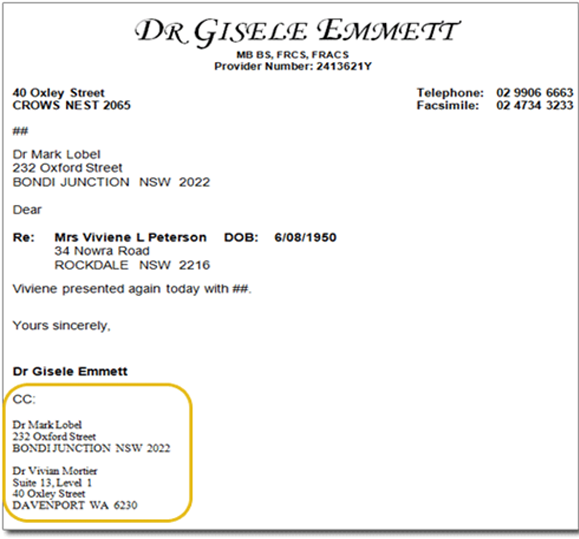
To determine the fields available for selection within a patient account, you must setup account contacts in a Class. The following example shows the CC details that the example Practice requires on a letter.
1. Within Bluechip, select Setup > Practice > Classes. The Class Setup window appears.
2. From the Account Class section, select Private.
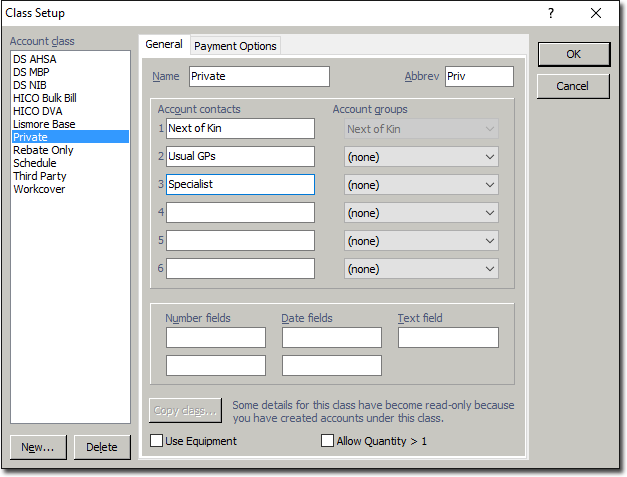
3. The Account Contacts section will display existing, pre-determined contacts. Click within the next available field to enter the required Account Contact. E.g. the example Practice requires the Account Contact 2 field as ‘Usual GPs’, and Account Contact 3 field as ‘Specialist’.
4. Select the Account Groups from the drop down list for the Account Contact, and then click the OK.
Step 2 - Setup the WP Template
To automatically generate the CC field(s) when typing a letter, WP fields are required to be setup in the template.
1. Within Bluechip, select Setup > Templates > WP. The WP Template Setup window appears.
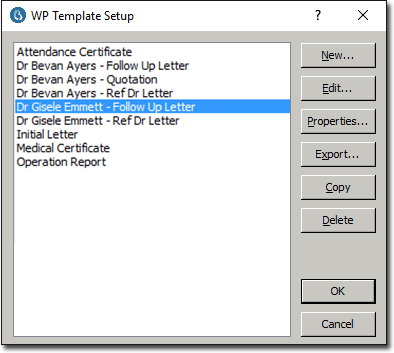
2. Highlight the required template and then click 
3. Take the cursor to the bottom of the template and press Enter to leave a required space from the last entry. Type CC: and press Enter twice to again leave a required space.
4. From the WP Fields menu, select Account > the appropriate Addressee > Name and Address.
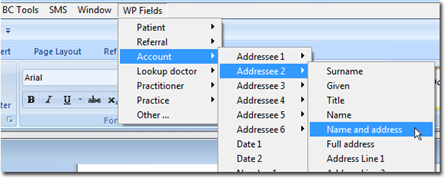
For example. in Account Contacts setup, new account contacts were entered in fields 2 and 3. Therefore, we are required to select the first CC as Addressee2.
5. Repeat the previous step if an additional Account Contact was added at the setup stage. In this example there was a second Account Contact required. Therefore, press Enter to leave a required space, go back into the WP Fields menu > Account, select Addressee3, and select Name and Address.
6. This will generate the WP Fields to the template for the CC setup.
7. Click the Save icon to save the template.
Step 3 – Create a Patient Account
When creating a new Patient Account, you are now required to select the Account Contacts. These Account Contacts are selected here; to generate as the CC’s on the Patient letter.
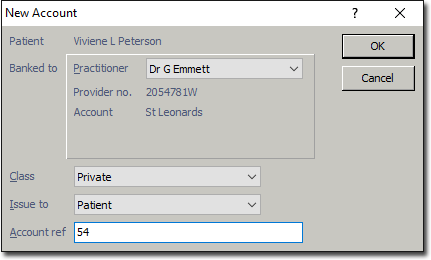
1. From the Patient Details, create a new Account by clicking the New button.
Note: If the patient account exists, the account can be edited to select the contact fields.
2. The New Account window appears. Select the required Practitioner, class as ‘Private’, and then click the OK button.
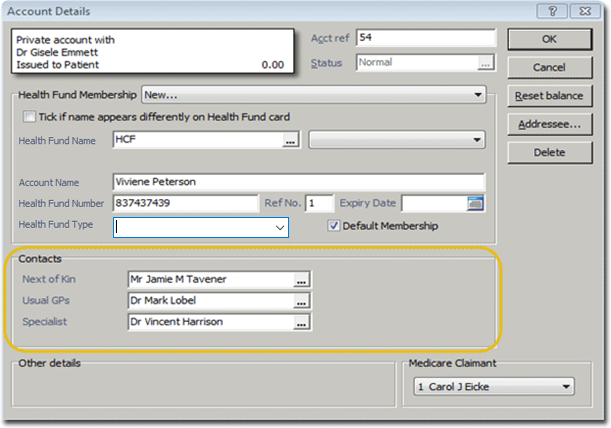
3. The Account Details window appears. Select;
o Health Fund Membership as New
o Health Fund field either enter or click into the list to select the required fund.
o Enter the Account Name as on the health card, or if the name differs, select the option above Health Fund.
o Enter the Membership No. , Ref No. and select the Default Membership option. This will generate the details onto the Patient Details screen.
Note: If a Health Fund had been entered previously, it will appear in the Health Fund drop down list.
4. Select the required Contacts by clicking the drop down lists, and then click OK.
Note: The selected Contact fields have set the account for billing and to automatically generate the CC details to the correspondence for the Patient if required.
Step 4 – Typing the Letter
When you are ready to send the letter for the patient, there are now two fields to be selected when composing a new letter. Due to the setup within the template and patient record, the letter will automatically generate the required CC details. In the following example, the Practice required the Usual GP and Specialist CC’d in the letter.
1. From within the patient’s record, select the Correspondence margin menu, and the click the New Letter button. The New Document window appears, verifying the Patient’s name.
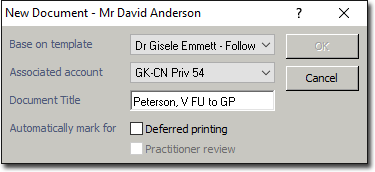
2. Via the Base on Template drop-down list, select the letter required.
3. Via the Associated Account drop-down list, select the required account.
4. Click OK. This will display the letter with the CC details.