Stage 1: Create Fee List from Health Fund Contract
PART A
1. You will have received a Master_Template Hospital Fee List, which is located in your Day Surgery folder. Make a copy of this Master List saving it as a CSV file and complete the following steps using this copy so you always have a clean Master_Template Hospital Fee List.
2. Open the Master_Template Hospital Fee List.
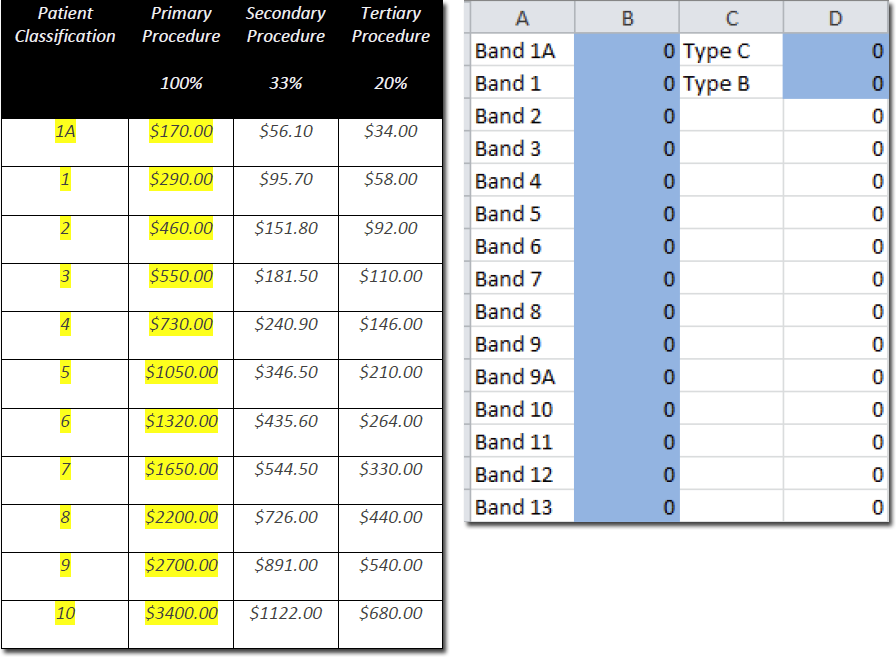
3. Open the 2nd tab located bottom left of the sheet (‘Fee’) and enter the contract amounts for each Band in Column B (if there is a fee on the contract for Type C and Type B procedures, enter this in Column D).
Theatre Bands
4. Go back to the 1st tab (‘Template Hospital Fee’) and select Column D – Health Fund Benefit – which should now have all the fees populated. Right-click over the column header and copy, then right-click again in the same column and select Paste Special… Then, select ‘values’ and  . Now select Columns B and C and delete from the spreadsheet.
5. You will now need to add the case payments and accommodation bands as per the health fund contract using the format in the example below;
No spaces in the MBS Item column and inverted comma’s [“ “] need to be placed at the beginning and end of the description. Patient Classification Primary Procedure 100% Secondary Procedure 33% Tertiary Procedure 20% 1A $170.00
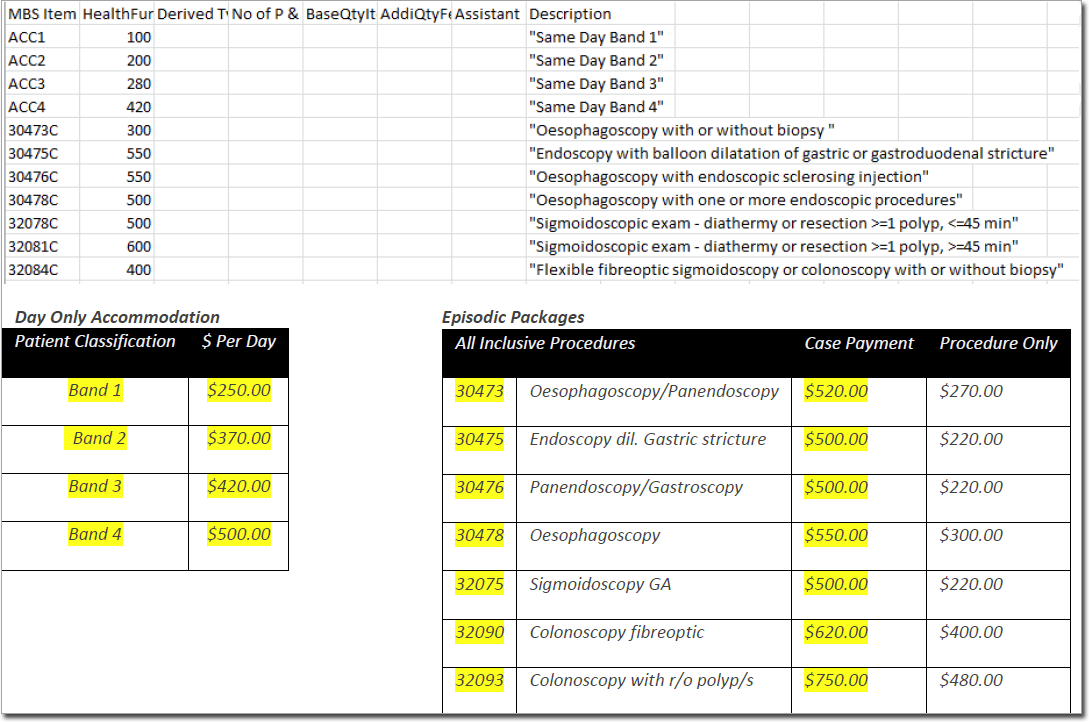
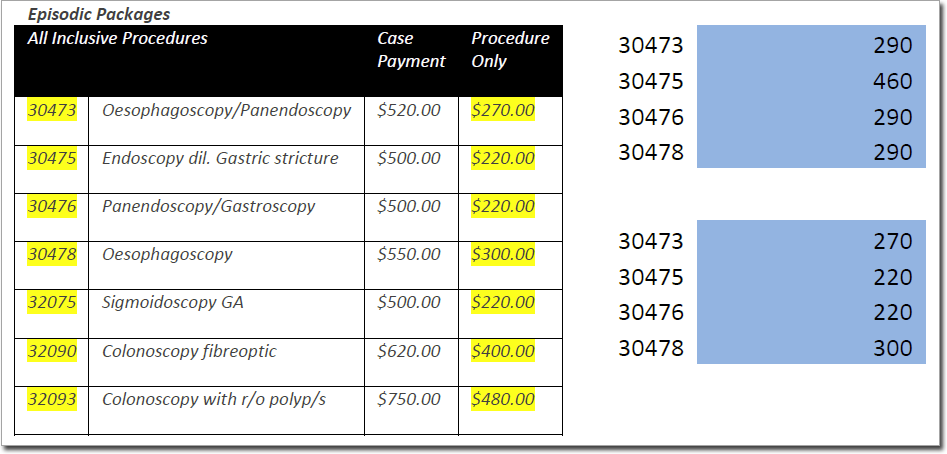
6. Change the ‘Procedure Only’ fees in the Fee List for each item that is specified in the contract.
o See example below. The first blue screen shot shows the fees as per the item banding. However, because the contract has specified a ‘Procedure Only’ fee (yellow highlight) for these particular items, this overrides the associated banding fee, and needs to be changed as demonstrated in the second (blue) screen-shot.
7. Now, add any prosthesis items to your list, ensuring you enter an Item Code (Column A), dollar amount (Column B), and description (Column H).
8. Save the spreadsheet as a CSV file to your Day Surgery folder. Use the name of the fund, so you can easily identify the list later.
9. Repeat the above steps for each health fund contract, ensuring to save each one with the correct health fund name.
10. In Bluechip, select Setup > Lists > Service Items. The Service Item Lists window appears.

11. Click  The New Service Item List window appears.

12. Name your list (e.g. 'IHC', 'HCF'), enter an abbreviation, and click
13. You are returned to the Service Items List window, where your new list now appears Select your new Service Item List with the corresponding health fund name, and click 
14. The Fee Import window appears.
o Browse to your saved CSV file, then click 
o Once completed, click 

15. Repeat steps 9 through 14 for each health fund.
PART B
1. Select one of your newly created Service Item Lists and click 
2. The Fee Import window appears. Browse to and select the ‘Service Item Import’ file, which is located in your Day Surgery folder.
o Tick the ‘Apply to More Fee Lists’ check box, and select all your newly created Service Item Lists.

3. Click This step updates all the properties for each MBS item and the prostheses items.
All accommodation and case payments items must be updated within Bluechip with the correct service item type using one of the two methods below.
METHOD ONE
1. Open your Service Item List.
2. Locate and select the item to be updated.
3. Click  The Edit Item Details window appears.
![]()
4. Via the Service Type drop-down list, select the applicable service type (e.g.., Accommodation or MBS Case Payment).
5. Click
6. Repeat for the remaining Case Payment and Accommodation items in each health fund list.
When updating your DVA list to select ‘DVA Case Payment’ rather than ‘MBS Case Payment’.
METHOD TWO
1. In Bluechip select Reports > BC Reporter. Login with your normal login details. The Bluechip Custom Reporter window appears.
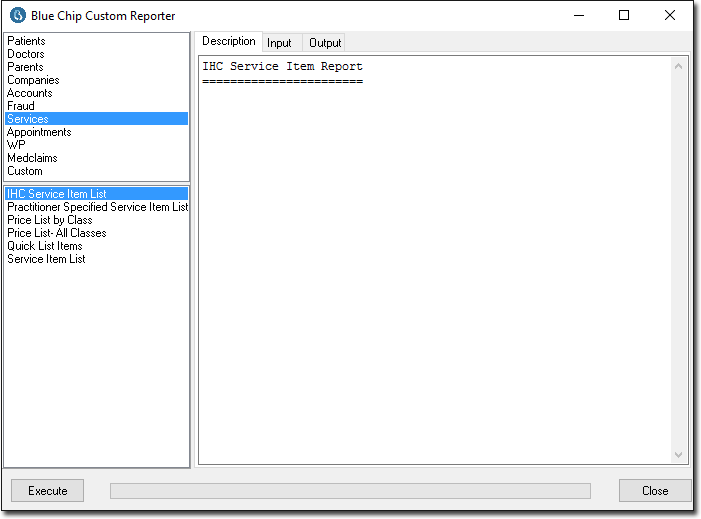
2. In the top left section select Services.
3. In the bottom left section select IHC Service Item List.
4. In the right hand section select the Input tab.
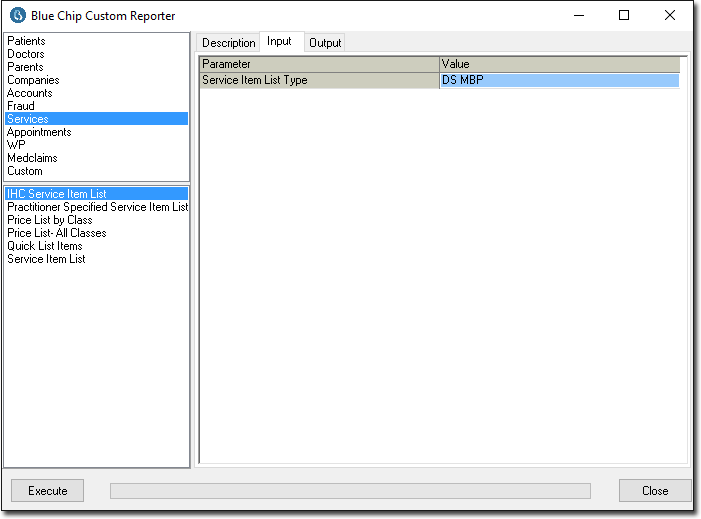
5. Type the name of your list exactly as it appears in Bluechip in the box under ‘Value’ (or you can copy and paste this directly from your Service Item List).
6. Click  This will export the list to Excel.
7. When Excel opens, locate column B (Service Type), and:
o Enter MBS Case Payment next to each case payment item.
o Enter Accommodation next to each accommodation band.
8. Save as a CSV file to your Day Surgery folder with the name of the health fund.
9. In Bluechip select Setup > Lists > Service Items and select the service item list to be updated.
10. Click Select
11. Browse for your file, and click
If all your health fund contracts cover the same items as Case Payments you can select ‘Apply to More Fee Lists’, however if they cover different items as case payments or if you have used different item codes you will need to repeat these steps for each health fund item list.
Stage 2: Create Company Group for IHC
1. Select Setup > Lists > Company Groups. The Setup Company Groups window appears.

2. Click The New Addressee Group window appears.
o Name the group "Health Funds".
o Under the ‘Addressee type’ drop-down box select “Health Fund”

3. Click
Stage 3: Create and Configure IHC Batch
1. Select Setup > Practice > Batch Types. The Batch Setup Window appears.

2. Click The New Batch Type window appears.
o Enter a name (e.g.., IHC)
o Select ECLIPSE-IHC (In Hospital Claiming) from the Method drop-down box.

3. Click to confirm your selection. You will be returned to the Batch Setup window.
4. Click  The ECLIPSE-IHC Setup window appears.
o Select the Patient Verification tab.
o Make the selections show in the image below.

5. Select the IHC Insurers tab.

6. Click  Bluechip will automatically update the insurers list (requires an active Internet connection), after which all insurers who participate in IHC will be flagged.
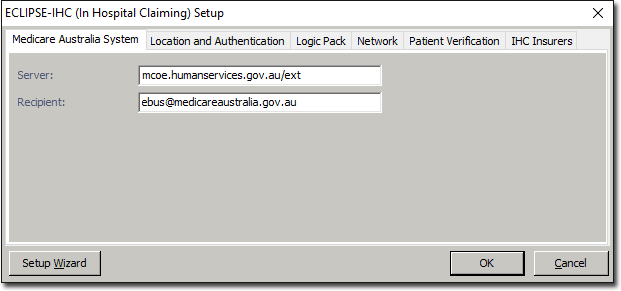
7. Select the Medicare Australia System tab. Set the following URLs:
o Server: mcoe.humanservices.gov.au/ext
o Recipient: ebus.@medicareaustralia.gov.au
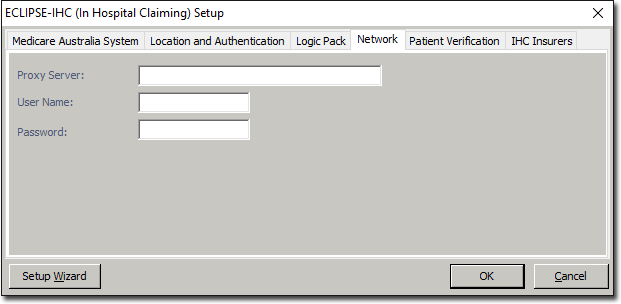
8. Select the Network tab to define your network information. This is used when sending claims to Medicare Online Claiming over a network.
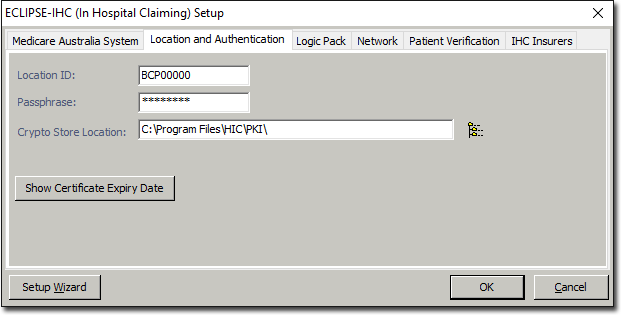
9. Select the Location and Authentication tab.
o Enter the Location ID, Passphrase and Crypto Store Location for your encryption certificate, as supplied to you by Medicare. You will already have this information recorded if you have configured Bluechip for Medicare Online Claiming.
10. Click  The IHC Setup Wizard appears. You will indicate which Company Group(s) from the database are health funds for In Hospital Claiming.
o The left section of the window lists the Company Groups to select from.
o The right section lists the Company Groups that are health funds for IHC. Initially this section will be empty.
o Within the Company Groups section, locate and double-click the group/s you wish to add to the Health Fund Groups section. Alternately, you can select a group and then click the > to move them into the Health Fund Groups section.

11. Click  You will see a list of all your setup health funds. You will need to select:
o Their Insurer Code (double-click within this field to reveal a drop-down list of options)
o The Fee List to use when billing (double-click to reveal drop-down options – ensure to associate each fund with their specific IHC fee list)
o Tick the Equitable Payment Model (EPM) check box if you have an EPM contract. This is a contracting model used by the Australian Health Services Alliance (AHSA) Health Funds.

12. Click In this step you will need to indicate for each of the Health Funds, which practitioners have EPMs.
o Select a health fund from the Health Fund section. The Practitioners in Non-EPM section will become populated with the practitioners associated with the selected health fund. It is initially assumed that none of the practitioners have EPM contracts.
o Locate and double-click on each practitioner who has an EPM contract with that health fund and they will be moved to the Practitioners in EPM section.
o Repeat steps a. and b. for each Health Fund.

13. Click 
14. Exit the Setup window.
Stage 4: Create Classes for In Hospital Claims
1. Select Setup > Practice > Classes. The Class Setup window appears.

2. Click located at bottom-left of the window. The Copy window appears.
o Enter a name and abbreviation for In Hospital Claiming (e.g.., ‘IHC’).
o As you are creating a new class, leave the ‘Copy from Class’ selection as None.

3. Click You will be returned to the Class Setup window.
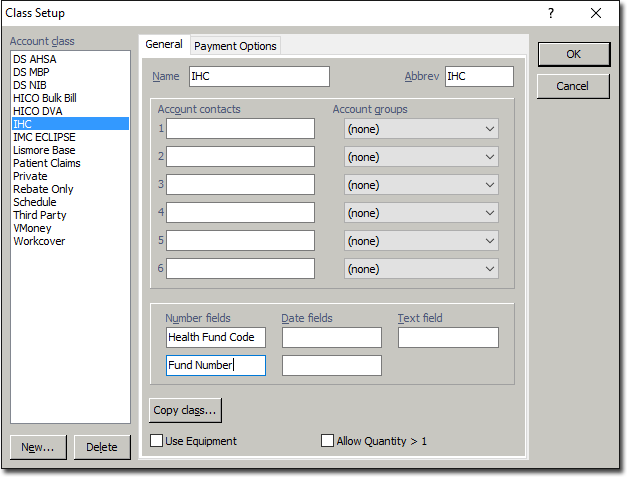
4. Within the Account Class section select the IHC account class you just created. Ensure you have selected the General tab.
o Within Number Fields enter 'Health Fund’ in the first text box.
o Within Number Fields enter ‘Fund Number’ in the second text box.
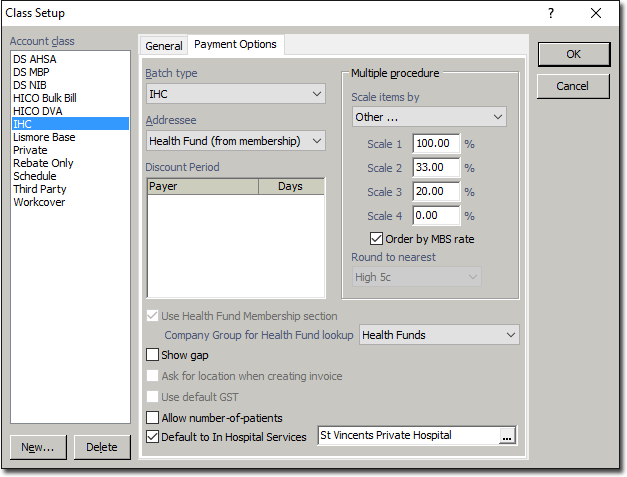
5. Select the Payment Options tab. Configure using the following settings:
o Batch Type: IHC batch type.
o Addressee: Health Fund (from membership).
o Company Groups for Health Fund: Health Funds.
o Tick the Default to In Hospital Services check box.
• If you have only one facility you will be invoicing for, you can now select your day surgery from the drop-down list. This information will be transferred to all invoices.
• If you invoice for multiple sites, leave this blank.
o Multiple Procedure > Scale Items By: Replicate any scaling specified in your health fund contract. If it is different to ‘100,50,25’, you will need to select Other from the drop-down and complete the scaling percentages in the boxes below (i.e.., Scale 1, Scale 2, Scale 3, Scale 4).
o Tick the Order by MBS Rate check box.
6. Repeat steps 2 to 5 for each IHC Health Fund.
7. Click to close the setup window.
Stage 5: Configure Day Surgery for In Hospital Claims
1. Select Setup > Practitioner > Practitioner Details. The Practitioner Setup window appears.
o Within the Practitioners section, select your Day Surgery entry.
o Within the Class Usage tab selected, tick the check box for the IHC class.

2. Select the Class Options tab.
o Within the Class section, select your IHC class. The Options for IHC section will populate with all the available Service Item Lists.
o Within the Options for IHC section, tick each Service Item List you want to associate with IHC.

3. Repeat the above steps for any other facilities you have that will be invoicing through IHC.
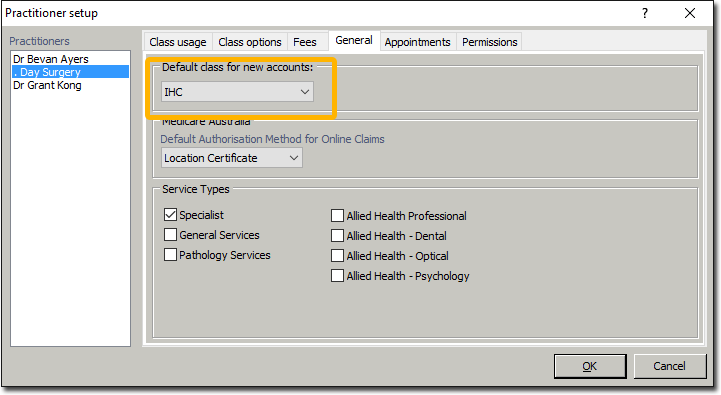
o If you wish to setup IHC as the default class for all new accounts, you can do this by selecting the General tab and choosing IHC from the drop-down list.
4. Click to save the changes and close the setup window.
Stage 6: Create an Estimate for In Hospital Claims
1. Open the patient’s record ensuring an IHC account class has been created associated to the Day Surgery.
2. Select Estimates from the menu on the left side of the screen.
3. Click at the bottom left of the screen. The New Estimate of Fees window appears.
o Ensure the In Hospital Services box is ticked, and select the relevant facility from the drop-down box.
o Ensure the Health Fund box is ticked, and tick the Multiple Procedure Scaling box if relevant. See Multiple Procedure Scaling for information.
o Ensure your Day Surgery is the selected Practitioner and IHC is the class selected.
o In the H/F Rebate based on field, choose the appropriate health fund from the drop-down box.
o Enter the relevant items (Theatre fee items and Accommodation Band item).
o Check the expiration date of the estimate and change if required.
o Name the Estimate (for future reference).

4. Click
Stage 7: Performing Online Eligibility Check (OEC)
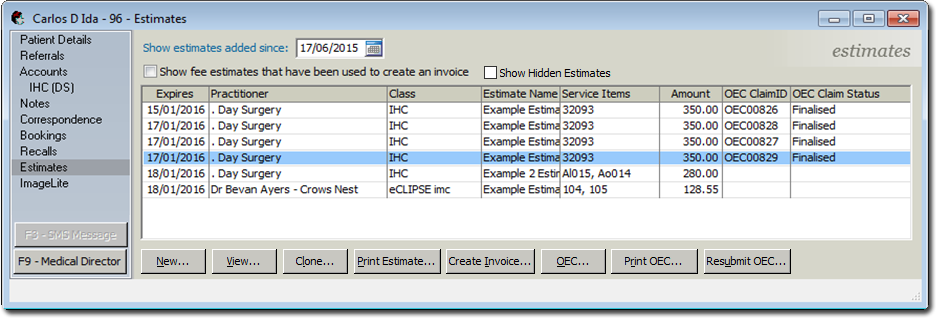
1. Within the patient's record, select Estimates from the menu on the left of the screen.
2. Select the relevant estimate that you created (Stage 6), and click  at the bottom of the window. The Online Eligibility Checking window appears.
o The example below is shown for illustrative purposes only. Please continue to Step 3 for information about how to configure this window.
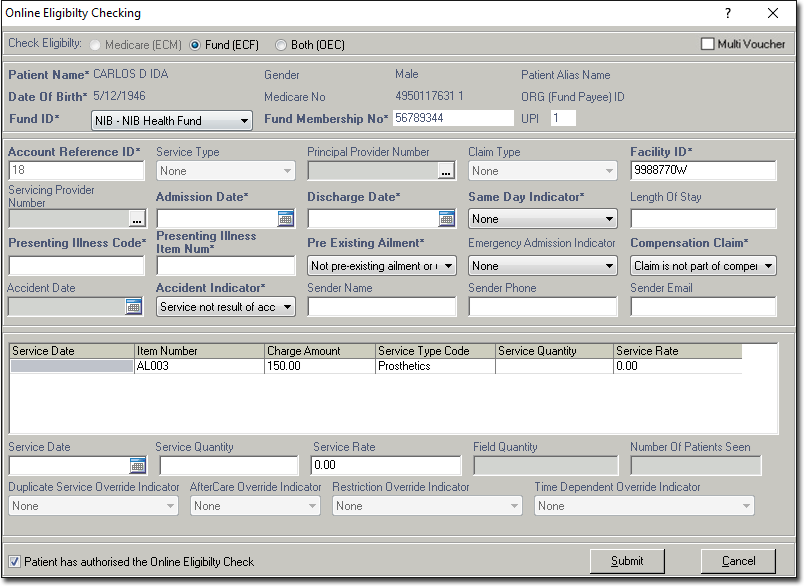
3. Select the Fund (ECF) option.
o A prompt will appear stating ‘Changing this selection will delete the entered values and the MBS ITEM numbers. Only Prosthesis and Miscellaneous items will be taken. Do you want to continue?’ Click to the prompt.
o Required fields are marked in bold*
4. All fields will be filled by default except for:
o Admission Date and Discharge Date
o Same Day Indicator; (select Same Day Procedure from drop-down list)
o Presenting Illness Item Number; (enter the primary procedure item number)
5. Click 
o You will be prompted to complete any mandatory fields you have missed.
o The OEC processing window will appear, and the OEC is sent via Medicare to the health fund for processing.

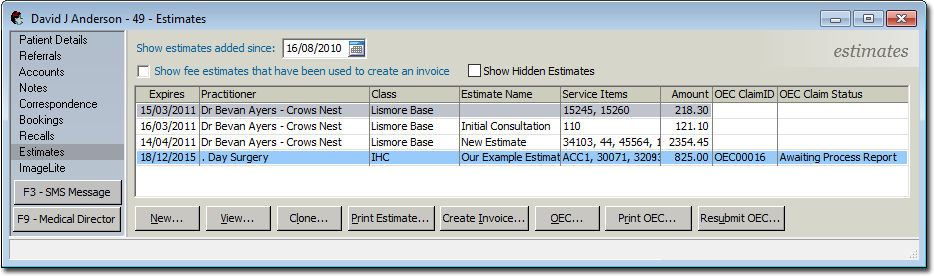
6. You will be returned to the Estimates window.
o The estimate will have been assigned an OEC ClaimID
o The OEC Claim Status will display Awaiting Process Report.
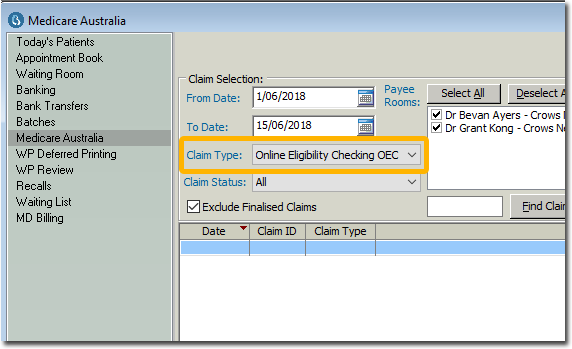
7. Click Practice Explorer located at bottom right of your screen, and then select Medicare Australia from the menu on the left of your screen.
8. Via the Claim Type drop-down list, select Online Eligibility Checking OEC.
9. Select the estimate you are awaiting confirmation on, and click ![]() The Medicare Australia – Processing Claim(s) window appears.
The Medicare Australia – Processing Claim(s) window appears.
10. Close the window, and note the status has changed to Process Report Received. Click  to view the OEC result.
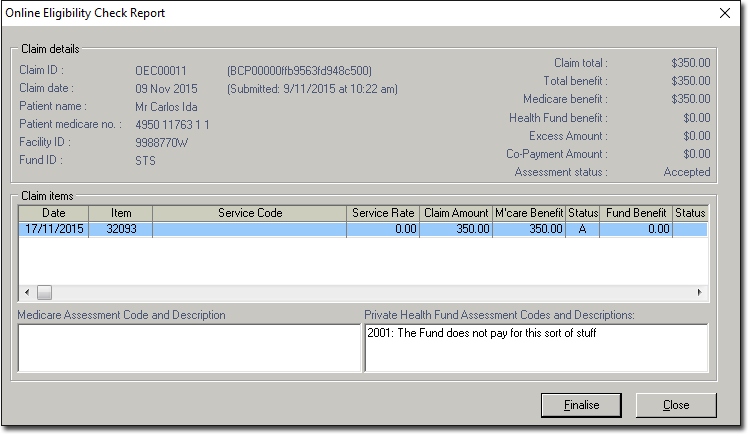
11. Click  . You will be prompted to print the Online Eligibility Check report. Click to print.
Stage 8: Create an Invoice from the Estimate
1. Open the patient’s record, and select Estimates from the menu on the left side of the screen.
2. Select the relevant Estimate and click  The Select Account window appears.

3. Select the account for which the invoice is to be created, and click
o At this time verify the patient if you have not previously done so.
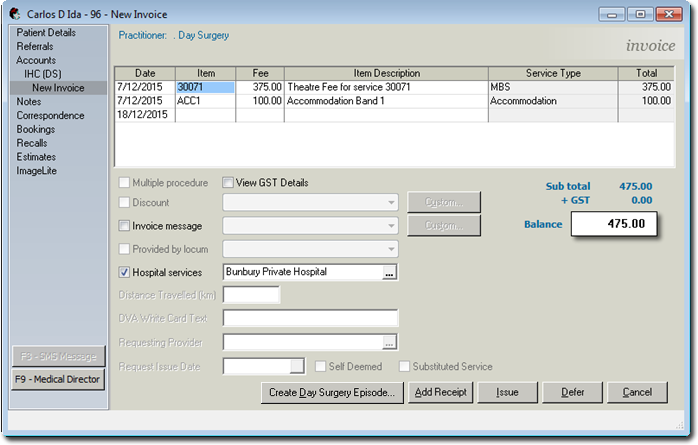
4. The New Invoice window appears with the items from the Estimate populated in the invoice.
o Additional Service Items (Accommodation – ACC1, Case payment) can be added to the invoice. For each item, you can;
• Modify the date the service was performed.
• Enter the service item number (by clicking into the item field, and then either typing the number or pressing Enter to search for items). As this invoice is specifically for IHC, only IHC items are available (see section 1.3 In Hospital Claim Service items Setup)
• Modify the fee (if you want to alter the default fee value).
• Modify the Item Description (if you want to alter the default).
5. Click  You will be prompted to indicate whether this invoice is associated with a referral for the patient. Select a referral, or choose the Not Applicable option, and then click
  to continue.
6. The Issue Invoice window appears, prompting you to enter the date on which the invoice was issued (with today’s date being the default).
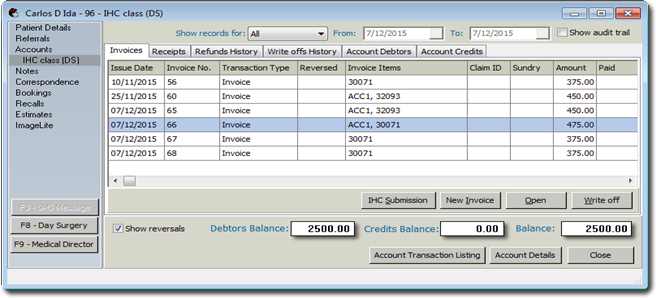
7. Click to confirm. You are returned to the patient's record, where the new invoice is now visible on the Invoices tab for the account.
Stage 9: Record Day Surgery Episode
1. Before you can submit IHC for processing, you must first record the episode in Day Surgery. Locate and select the relevant invoice.

2. Click  The invoice window appears.
3. Click  The Day Surgery Module window appears. You will be prompted to create a new Episode.

4. Click  to continue. The Day Surgery Module opens. Episode details can be recorded by entering information in all the tabs, which are headed:
o Demographics
o Admission
o Discharge
o Claim
o Fees
o Diagnoses
o Procedures
o Theatre
o Notes
o Cancer Registry
Once the episode is completed, the Day Surgery module can be closed. You are returned to the patient’s invoice. Close the invoice. You are now ready to submit the IHC for processing.
It is mandatory to record/complete the Day Surgery Episode prior to submitting an In Hospital Claim
Stage 10: Transmitting In Hospital Claims
1. Locate and select the invoice you completed the Day Surgery Episode for.
2. Click  You will be prompted that a Day Surgery episode must be completed. Click
3. The New In Hospital Claiming (IHC) form appears. All relevant data from the Day Surgery Episode and MedicalDirector Bluechip is pre-populated on this form.
o All fields marked in bold with * are mandatory.
o Some fields are pre-populated. Check these fields to ensure the correct data is present.

4. Once all information is completed press 
o If any required fields are missing you will be prompted to complete these before the claim will send.
o The claim will now be submitted to the health fund via Medicare Australia.
5. Once the Claim ID is generated; click  at the bottom-right to continue the retrieval of processing and payment reports.
6. Select Medicare Australia from the menu on the left side of the screen. The submitted claim appears at the top of the list, with a status of ‘Awaiting Process Report’.
Some claims may have a status of ‘Awaiting Submission’. Claims with this status would have failed the Client Adaptor validation, and will have to be edited to ensure successful submission.
8. Click ![]() to retrieve the processing report.
to retrieve the processing report.
o When the processing report is being retrieved, the response sent by the fund can be ‘rejected’ or ‘interim’ or ‘final report’.
o If the final processing report is available after the Transmit button is clicked, the Medicare Australia – Processing Claim(s) window appears, and the final Processing Report is downloaded. Final Report replaces Interim Report.
9. After the final processing report is retrieved, the status of the claim changes to ‘Awaiting Payment Report’, and the claim can now be viewed by double-clicking it to see the result (Accepted/Rejected) of the claim submitted. The Processing report will consist of invoice details, and service item details of the retrieved claims, which may assist you with any troubleshooting.
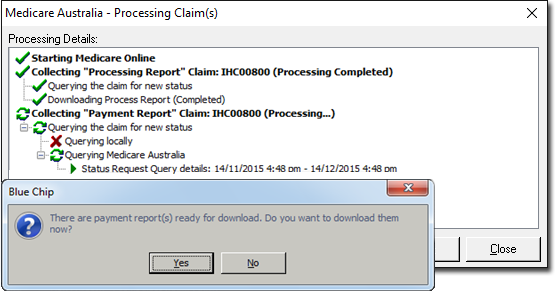
10. Click ![]() to download the payment report. The Medicare Australia – Processing Claim(s) window appears, and displays the downloading messages. You will be prompted that a Payment Report is available for download. Click to download the payment report.
to download the payment report. The Medicare Australia – Processing Claim(s) window appears, and displays the downloading messages. You will be prompted that a Payment Report is available for download. Click to download the payment report.
11. The downloaded Payment Report can be saved by clicking  Alternatively, click to return to the Medicare Australia window. Payment report will consist of the summary of health fund payments which will help the practice reconcile payments with the bank statement. It also consists of additional payment details on the paid claim.
Stage 11: Transmitting In Hospital Claims
1. In Practice Explorer select Medicare Australia from the menu on the left side of the screen.
2. Via the Claim Status drop-down menu, select ‘Ready to Receipt’. A list of all claims will appear that are ready to be receipted.
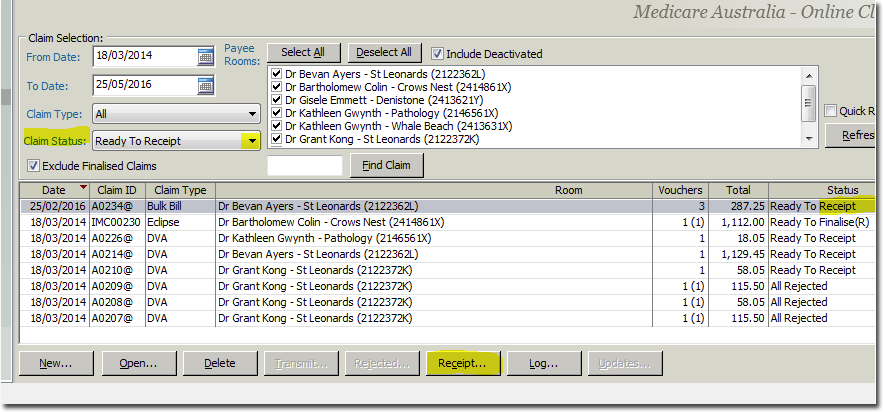
3. Select a claim and click  at the bottom of the screen. If there are any items within this claim that require any action other than receipting, you will be prompted at this stage to process these items first.
4. If the item/s are all paid with no queries or rejections, click within the Receipt window.