A patient claim applies to a situation in which a patient has received professional medical services, but has not assigned their rights to Medicare benefits to the servicing practitioner. Patient Claims are an additional service provided by the Practice to the patient. A statement is forwarded by Medicare to the Claimant within 14 days detailing, or including in the case of payment by cheque, the payment made. It will also contain details if the requested payment was not made. This feature now means patients don't have to visit Medicare Offices to collect their rebates – these benefits are paid directly into the patient's Bank account or using a cheque sent to a specified address
Your MedicalDirector Practice Management System allows individual patient claims to be processed in real time - referred to as PCI (Patient Claims Interactive). Practices also have an alternative method for sending patient claims, as patient claims can be grouped together and sent at a later time in one transmission (called 'Store and Forward Patient Claims'). This means that an Internet connection does not need to be maintained and is an activity that could be scheduled to happen at a specific time (for example at 18:00 every weekday).
This article describes the steps required to record, invoice, and submit Patient Claims. The following steps are covered:
1. Add Medicare details and a Practitioner Referral to the Patient Details window.
2. Create a Patient Claim Account.
3. Billing for Fully-Paid Patient Claim.
4. Billing for Part-Paid Patient Claim (gap only).
5. Receipting the Rebate Medicare Cheque.
Typical Patient Claiming scenarios:
o Fully-Paid: The patient pays the invoice in full, and then the claim is submitted to Medicare. Medicare reimburses the patient via the bank details/account provided by the patient, or by cheque. Covered in Step 3
o Part-Paid (patient pays the gap only): The patient is invoiced in full. However, they only make a part-payment to the account (gap payment only). Later, the claim is submitted to Medicare, and Medicare reimburses via a cheque sent to the patient. However, in this instance the payee is the practitioner, not the patient – the patient is required to forward the cheque to the Practice. Covered in Step 4
If the cheque is not presented to the Practice within 21 days, the practice should contact the patient.
Medicare periodically conducts searches for cheques that have not been cashed. If after 90 days a cheque has still not been presented to the practice, Medicare will cancel the cheque and credit the Practitioner’s account electronically.
Step 1: Patient Details
A patient’s Medicare card details and doctor’s referral must be recorded within the Patient Details window, for verification purposes, and to assist with the patient claim to Medicare.
1. Open the patient’s record. The Patient Explorer appears, and you are presented with the patient's details.
o Locate the Medicare section.
o Enter the patient’s Medicare Card Number and Expiry Date. This will automatically generate a Ref number - modify it if necessary.

2. Click 
3. If the patient’s name, as recorded in Bluechip, differs to that as recorded with Medicare, you will be prompted to confirm the difference. If this occurs;
o Select Yes to update the information in Bluechip with that on the card.
o Select No to leave the name in Bluechip as-is. This prompt will display for each verification.
Otherwise; you will be prompted with a successful verification.

4. Click 
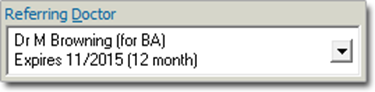
5. Ensure the Doctor’s Referral is recorded in the Patient’s record.
Step 2: Create a Patient Claim Account
A Patient Claim account is required when you wish to bill a claim for a private patient. You use the Patient Claim account to issue invoices and to submit the claim to Medicare on behalf of the patient.
1. Within the Patient Details window, select the Accounts margin menu, and locate an existing Patient Claim account.
o If one exists, double-click it to open it. Proceed to Step 3.
o If one does not exist, create a new account by clicking  Continue with Step 2..
2. The New Account window appears. Select the required Practitioner, Class as ‘Patient Claim’, and then click
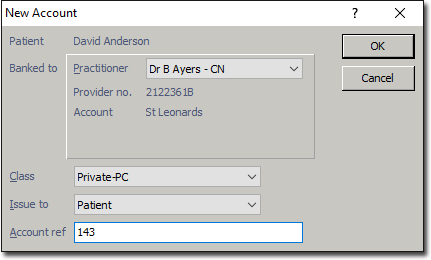
3. The Account Details window appears.
o Ensure the correct Practitioner and Class (Patient Claim) has been selected, and click
o If either the Practitioner or Class has been selected incorrectly, click  to display the New Account window again for correct selection.
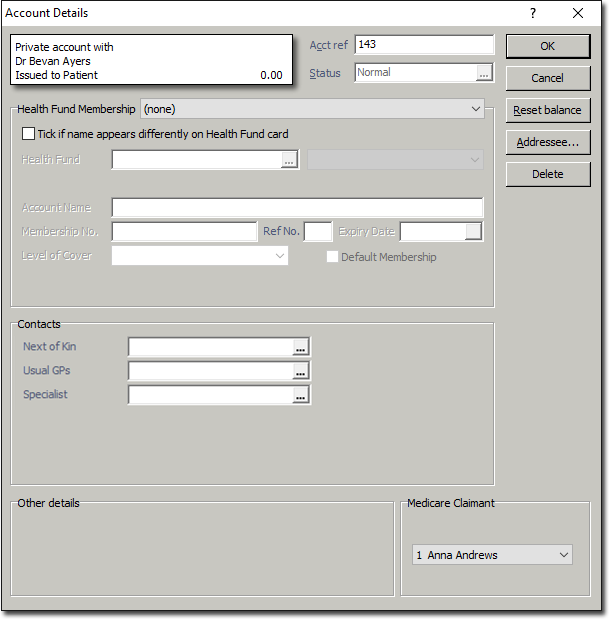
4. The new Patient Claim account is added to the list of accounts in the Patient’s Record. Double click or click  to open the account.
Step 3: Billing for Fully-Paid Patient Claims
A Fully-Paid Patient Claim is one in which the patient is invoiced the full amount, and pays in full. Then the Practice provides the service of submitting the claim to Medicare on the patient’s behalf.
1. Within the patient’s record, select the Accounts margin menu, and then locate and double-click the account you wish to bill to.
2. Click  to begin issuing a new invoice. The Medicare Verification prompt appears.
o Click if required to verify.
o Click  if already verified.

3. Select the Service Type if required. There will only be multiple service types if you have pre-configured in setup.
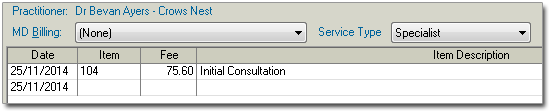
4. Enter the appropriate Service Date and Item Number as desired. A Service Item’s fee will appear automatically. Ensure the fee is correct.
5. Tab to the Service Text field, and then double-click the field to reveal the  button. Click this to add text for Medicare if required, and then click
Repeat steps 4-5 if additional Service Items are required on the invoice.
6. Because the patient is paying this account, click 
7. When prompted, select the associated Referral, and click 
8. You will be prompted to enter the date-of-issue for the invoice. The default is the current date.
9. Click The New Receipt window appears. Select the Payment Method Type (Cash, Cheque, Direct Debit, EFTPOS Manual or EFTPOS Auto (TYRO), Bank/Card Type, and enter the full payment Amount from the Patient.
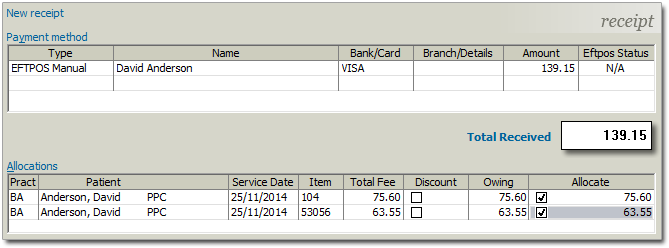
10. Allocate the payment amount to the invoice by ticking the check box against each amount owed in the Allocate column.
11. Click  You will be prompted to enter the date-of-issue for the receipt. The default is the current date.
o **Important: If your Practice does not use a TYRO Terminal, bypass the next Step**
12. Click If the Practice has a TYRO terminal, and has selected a receipt Payment Method of ‘EFTPOS Auto’, the TYRO terminal (Patient Easyclaim) window will appear. Have the patient swipe their card, select the appropriate account, type and enter their PIN. The online payment process commences and TYRO will print a receipt for the patient.

13. The Print Report window will appear. It is recommended to ask the patient “Would you like me to submit the claim to Medicare on your behalf?”
o If Yes: Patient does not require copy. Click the File button to cancel printing.
o If No: Patient decides to claim with Medicare directly. Click the Print button to print an invoice/receipt.
14. On the Invoice tab, click the Patient Claim button (located bottom-right). The New Patient Claim window will appear.
15. Select the required Refund Method of payment. The Refund Method selection options are as follows:
o EFTPOS Card: If the patient’s payment is via a card connected to a Savings or Cheque account using a TYRO Terminal, the refund will be reimbursed to the account within ~10 seconds.
o Cheque: If the patient’s payment is via a card connected to a Credit Account (Visa, MasterCard) using a TYRO Terminal, or any card via a Merchant Bank Terminal, Cash or Cheque, the claim will be submitted to Medicare. If the patient has bank details logged with Medicare, the cheque will be overridden, and reimbursement will be made to the provided account. If the Patient has not logged bank details with Medicare, Medicare will reimburse via cheque sent to the Patient.
o EFT (Bank Account Details required): It is recommended not to use this Refund Method.
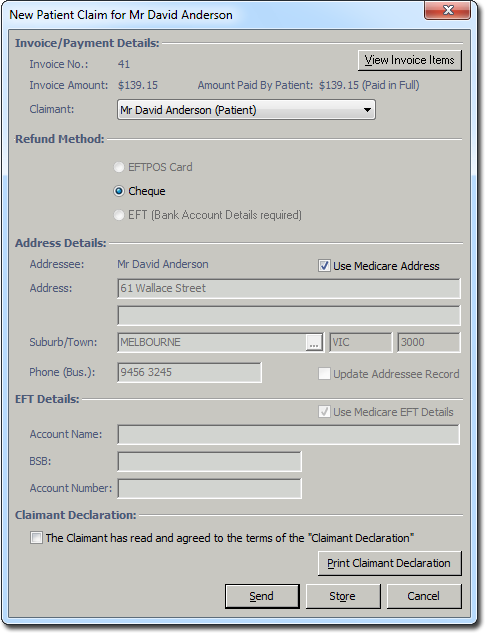
17. Select the check box for the Claimant Declaration and click 
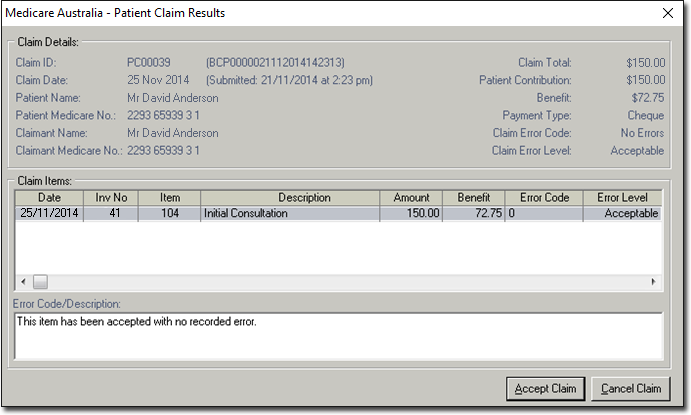
o The Patient Claim Results window appears. Click  This will transmit the claim to Medicare, where the Patient’s banking details are checked.
o If EFTPOS Card was selected, and the Patient’s payment was from a Savings or Cheque Account through the TYRO Terminal, the TYRO terminal (Patient Easyclaim) window will re-appear. Have the Patient re-swipe their card, selecting the appropriate account type, and entering their PIN. The online reimburse payment process commences. The Patient will be prompted to accept the claim on the terminal, and then TYRO will print a receipt for the patient. A Lodgment Advice prompt will appear to print report if required.
On the Invoice tab, notice that the invoice now has a Claim ID, confirming submission. The claim has also been flagged in the Medicare Australia module as a Finalised Receipt Claim (hidden as a processed claim).
Step 4: Billing for Part-Paid Patient Claims
A Patient Claim account is required for billing claims for the Private Patient. The patient pays part of their account (gap only). Then the Practice provides the service of submitting the claim to Medicare on the patient’s behalf.
1. Within the patient’s record, select the Accounts margin menu, and then locate and double-click the account you wish to bill to. Click to begin issuing a new invoice.
2. The Medicare Verification prompt appears.
o Click OK if required to verify.
o Click Ignore if already verified.
3. Select the Service Type if required. There will only be multiple service types if you have pre-configured in setup.
4. Enter the appropriate Service Date and Item Number as desired. A Service Item’s fee will appear automatically. Ensure the fee is correct.
5. Tab to the Service Text field, and then double-click the field to reveal the button. Click this to add text for Medicare if required, and then click
Repeat steps 4-5 if additional Service Items are required on the invoice.
6. Because the patient is paying this account, click
7. When prompted, select the associated Referral, and click
8. You will be prompted to enter the date-of-issue for the invoice. The default is the current date, click
9. The New Receipt window appears. Select the Payment Method Type (Cash, Cheque, Direct Debit, EFTPOS Manual or EFTPOS Auto (TYRO), Bank/Card Type, and enter the Gap Amount only from the Patient.
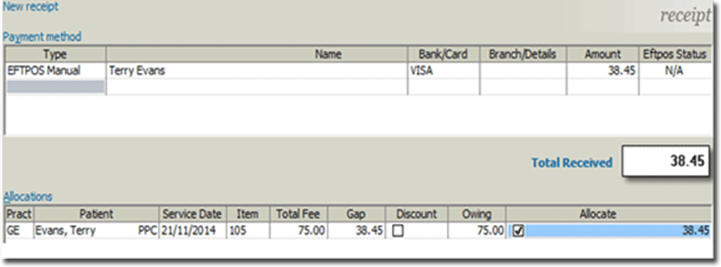
10. Allocate the invoice to the part payment amount by ticking into the Owing tick box in the Allocations area.
11. Click
12. You will be prompted to enter the date-of-issue for the receipt. The default is the current date, click
**Important: If your Practice does not use a TYRO Terminal, bypass the next Step and proceed to Step 15**
13. If the Practice has a TYRO terminal and has selected the Receipt Payment Method as EFTPOS Auto, the TYRO terminal (Patient Easyclaim) window will appear. Have the Patient swipe their card, select the appropriate account type and enter their PIN. The online payment process commences and TYRO will print a receipt for the patient.
14. The Print Report window will appear. It is recommended to ask the patient “Would you like me to submit the claim to Medicare on your behalf?”
o If Yes: Patient does not require copy. Click the File button to cancel printing.
o If No: Patient decides to claim with Medicare directly. Click the Print button to print an invoice/receipt.
15. On the Invoice tab, click the Patient Claim button (located at the bottom right). The New Patient Claim window will appear.
16. The default (and only) Refund Method available is Cheque, due to the Patient’s part payment; Medicare will reimburse by a cheque that is sent to the Patient, with the Payee the Practitioner. The Patient is required to forward the cheque to the Practice.
17. Select the check box for the Claimant Declaration and click
18. The Patient Claim Results window appears. Click This will transmit the claim to Medicare.
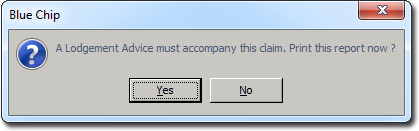
19. A Lodgment Advice prompt will appear to print report if required.
20. On the Invoice tab, the invoice indicates a Claim ID confirming submission and a rebate balance outstanding to the Practitioner.

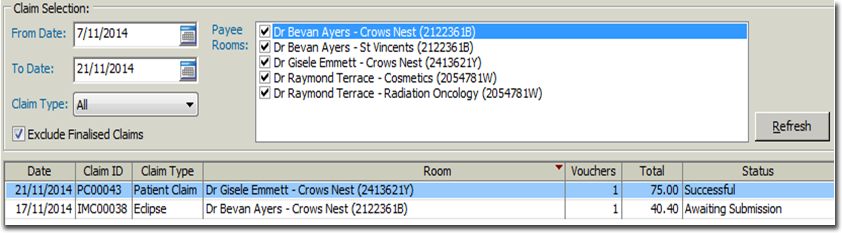
The claim has also generated into the Medicare Australia module with a Successful Status. The Patient Claim appears on the current date range window waiting for Medicare Rebate Cheque.
Step 5: Receipting a Rebate Medicare Cheque
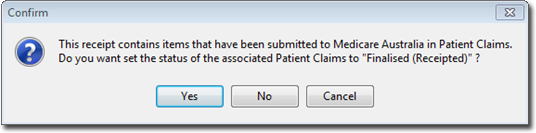
When a Rebate Medicare Cheque from a Part Payment (gap only) Patient Claim Account is received, the cheque is to be receipted into the Patient Profile, Patient Claim Account. This will balance the Patient’s account and generate the payment into the Practitioner’s banking.
1. Within the Patient Claim Account; access the Receipt tab and click  to issue the receipt.
2. The New Receipt window will appear. Select the Payment Method Type as Cheque, Name (Medicare Details), Bank/Card Type, and enter the Amount on the cheque.
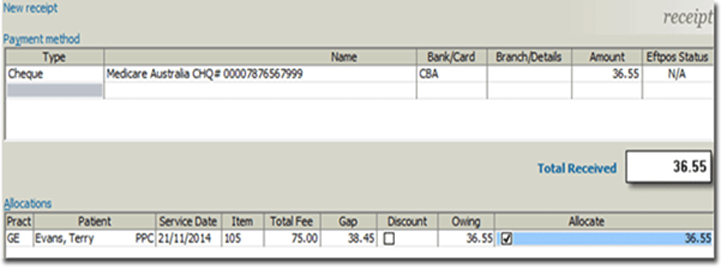
3. Allocate the owing amount to the rebate payment amount by ticking the Allocate check box in the Allocations area.
4. Click
5. You will be prompted to enter the date-of-issue for the receipt. The default is the current date, click
6. A Confirmation prompt will appear. Click  to set the Medicare Status for the Patient Claim to Finalised (Receipted) claim in the Medicare Module. The claim will no longer appear.