Medicare Australia payments are sometimes affected by GST, which affects the patient account by making it differ between 1c to 5c due to rounding. The functionality to assist the GST rounding is within MedicalDirector Bluechip’s Class setup. The Round to Nearest drop-down list is provided so a Practice can select the option that best suits its business.
If a Practice has patient accounts with 1c to 5c credit balances due to GST rounding; the following steps will provide a work-around to balance the accounts:
1. Create a new Service Item called Sundry, Overpayment, or a description is appropriate to the Practice
2. Issue an Invoice for the credit amount
3. Allocate the existing invoice, new invoice to the receipt
Note: If the patient account does not balance due to a debit amount; a normal refund or write off process is required.
Class Setup – Round to Nearest
To setup the class for selecting a round-to-nearest option. This will hopefully eliminate the GST rounding issue with the Medicare payments.
1. Within Bluechip, select Setup > Practice > Classes, select the appropriate Account Class. Click the Payment Option tab and click the Round to Nearest drop-down list.
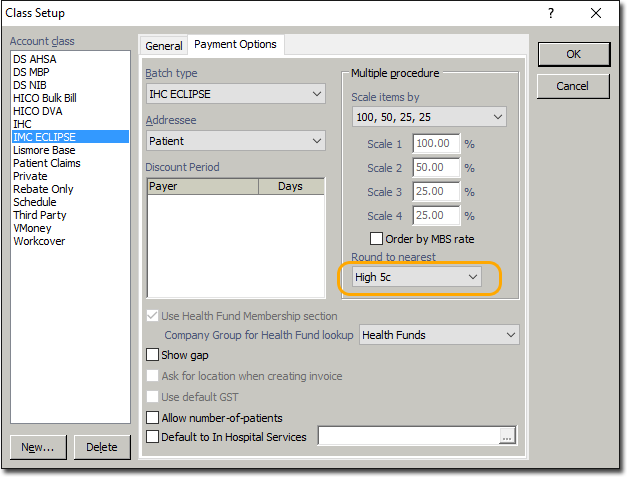
2. Select the appropriate rounding option. You may be required to try more than one option to see which best suits the practice.
3. Click 
4. Repeat the process for each class.
Create a New Service Item
Creating a new miscellaneous Service Item called Sundry, Overpayment (or whatever service item description is appropriate for your practice) will cater for the invoice required on the Patient file.
1. Select Setup > Lists > Service Items, and then select Miscellaneous from the Service Item List.

2. Click  to display the Service Item window; which lists the available miscellaneous service times.
3. Click  to display the New Serviced Item window, and enter the new service item number. In this case an alpha abbreviation is suitable. For example, the Service Item Overpayment is the most appropriate for the demo Practice’s workflow and the number (abbreviation) is Over.
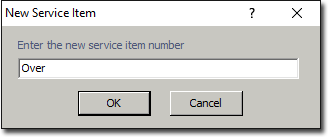
Note: This field has 8 characters only. The description text box will cater for the extended name or details required.
4. Click
5. Click the new service item to highlight. Leave the Standard Fee field blank and enter the appropriate Description.
Note: Leaving the Standard Fee blank ensures the amount is being determined when issuing the invoice, balancing the patient’s record.
6. Click 
Issue the Invoice
When a credit amount is outstanding in a patient record, and it is not being refunded to the patient; an invoice is required. The invoice will balance the patient’s record and also generate the amount as revenue.
1. From the Patient Details screen, highlight the appropriate account, right-click and select Open Account. An outstanding credit amount is noted.

2. Issue an invoice to balance the record.
o Click 
o Enter the miscellaneous Service Item.
o Enter the outstanding amount in the Fee column
o Click 
o Select Referral, OK for date, click OK through the Allocate Credit Amounts screen, and click File or Print invoice. Unable to allocate at this time.

3. The invoice has recalculated a $0.00 balance. However, the Debtor and Credit Balances are still outstanding. A Manual Allocation is required to reconcile the invoices to the receipt.
Invoice tab

Account Balances

4. In the patient’s record, click the Account Credits tab. This display the receipt to the top of the screen, and the credit type details as payment to the bottom of the screen.
Account Credits tab (top of screen) Details (bottom of screen)

5. Click the Allocate/Refund Credit Payment button. This displays the Allocate Credit Amount screen, with the receipt to the top of the screen already selected to allocate and the available invoices to allocate to the bottom of the screen. to allocate the invoices. The Payment Amount Available and Total Allocated amount must equal to finish the process. Click the OK button.
6. All Account Balance are now $0.00.

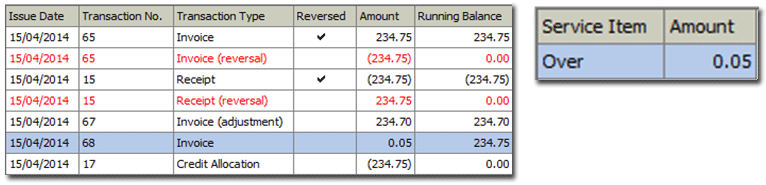
7. Still on the Account Credit tab, the Running Balance now shows as $0.00, the Credit Allocation and the adjusted Prepayment (Service Item - Overpayment) transactions. These are the double-sided entries required to balance the file.
Account Credits tab (top of screen) Details (bottom of screen)

It also generates to the Account Debtor tab, listing the audit trail of transactions issued to balance the file and the overpayment amount.
Account Debits tab (top of screen) Details (bottom of screen)