Changes to Workflow from MedicalDirector Pracsoft 3.10.5
Now, when Recording a Visit
- Select the Pay Now option
- Select EFTPOS Auto from Payment Type (for Integrated EFTPOS Transactions)
- Specify which Bank account to bank the receipt to.
- Click Receipt to start the process.
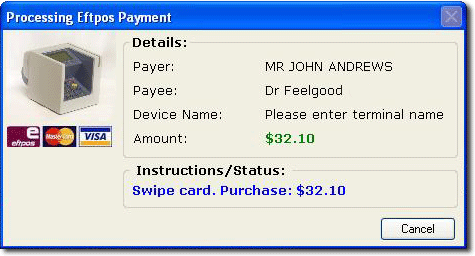
Processing of the Integrated EFTPOS Auto transaction starts when Receipt is pressed. This sends the Merchant ID of the selected bank account, along with the payment amount, to the EFTPOS Auto Device.
A screen is displayed within Pracsoft, which prompts you with each step through the EFTPOS transaction, so that you can ask the patient to: insert their card; enter their PIN; and so forth.
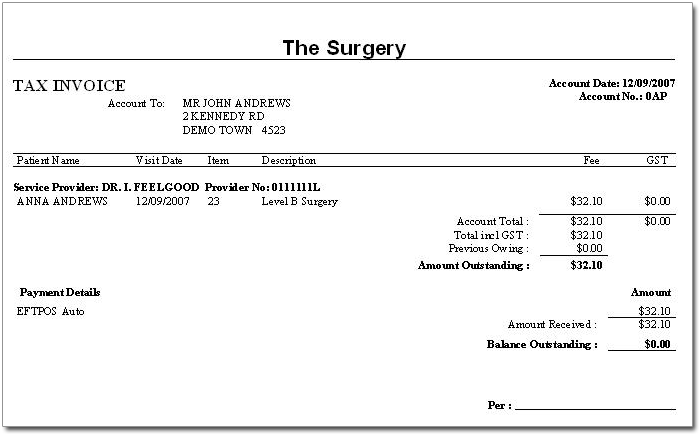
Once the payment transaction has completed successfully, you are able to save or save and print the receipt as normal. Once a Integrated EFTPOS Transaction has been successful, you cannot cancel the account as payment has been received and visit has been transmitted to Medicare Australia.

Receipt Window
- The option EFTPOS Auto has been added to the Payment Type drop-down menu in the Payment Details section of the Receipt window.
- A new Status column has been added to the Payment Details grid to indicate if an Integrated EFTPOS Auto payment has been processed or failed.
- Processing of the Integrated EFTPOS Auto transaction starts when the Receipt button is pressed. This sends a request to the EFTPOS Auto Device for each EFTPOS Auto item in the Payment Details list that has not already been processed.
- A screen is displayed within Pracsoft, which prompts you with each step through the EFTPOS transaction, so that you can ask the patient to: insert their card; enter their PIN; and so forth.
- Once all of the Integrated EFTPOS Auto transactions have been processed successfully, the standard workflow resumes.
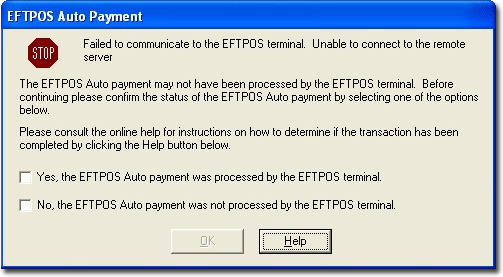
- If any of the Integrated EFTPOS Auto transactions fail, you will be returned to the Receipt window.

Initialising Integrated EFTPOS
1. Ensure your EFTPOS machine is connected and configured first.
2. Select
the account for which you wish to use Integrated EFTPOS, and then
click Edit The Bank Account Details
window appears.

3. Enter the Merchant ID for this bank account that you noted in Step 6. This information will be provided to you via e-mail once your application has been Credit Checked and approved by Tyro, and is also available via Menu > Merchant Info. Click the Save button to confirm.
4. Repeat Steps 9 - 10 for each bank account you wish to use Integrated EFTPOS with. Failing to setup each bank account's Merchant ID will result in this information being required when you perform a receipt for that Practitioner.
5. When you have completed modifying bank accounts, click the Close button on the Bank Account Setup window.
6. For each workstation that will be used to record Integrated EFTPOS payments, select Setup > EFTPOS/Medicare Easyclaim > Device Configuration, and record a Friendly Name and the IP Address for the EFTPOS Terminal it will use. This must be performed, even if there is only one EFTPOS Terminal. You are now ready to use Integrated EFTPOS.
Processing Receipts with Integrated EFTPOS
1. When
processing a receipt, in either the Record
Visit or the Receipt window,
select EFTPOS Auto from the Payment
Type drop-down menu.
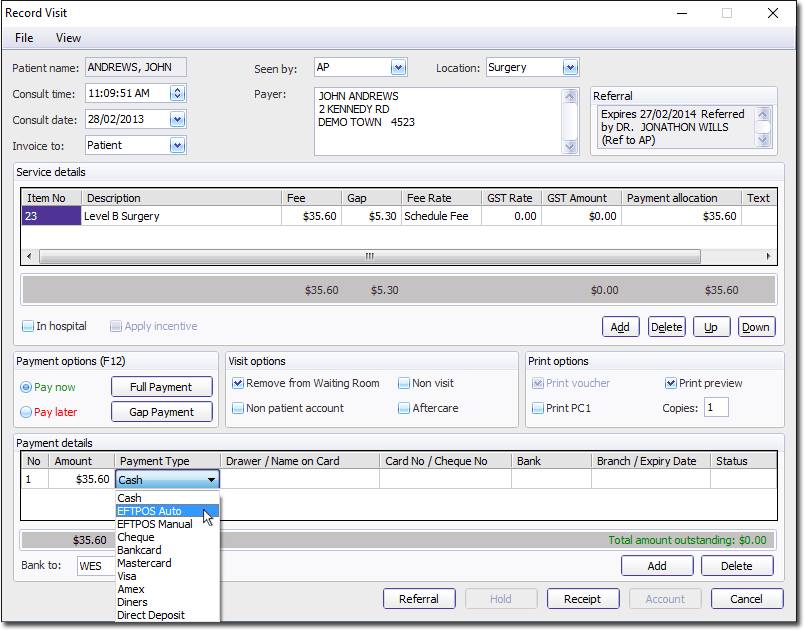
2. Click Receipt to start the process.
3. The
first of a series of EFTPOS Payment Processing screens appears.
You will be prompted to have the patient swipe their card.
4. You
will be prompted to have the patient select their account.

o If the patient chooses to pay by EFTPOS, you will be prompted to have them enter their PIN, after which the transaction will be processed.
o If
the patient chooses to pay by credit, the transaction will be
processed and you will be prompted to have the patient sign the
EFTPOS transaction receipt. Check the patient's signature against
that on their card. MedicalDirector Pracsoft will prompt you with
the question 'Signature OK?', at which point you will need to
select OK on the
EFTPOS terminal.
![]()
This concludes the EFTPOS Payment Process.
5. A
receipt can be printed, which indicates that the transaction used
EFTPOS Auto