
Normally a receipt is issued at the time you record a visit for a patient, because normally the account is paid whilst the patient is there. However, for institutional accounts (for example) a receipt must be issued later, because these types of accounts are usually paid some time after the patient's visit.
1. Either;
o Click
o Select Accounts > Receipts/Payments.
2. The Payment/Receipts
window appears.

3. Via the Payment For option, indicate whether you wish to search for Private Patient accounts or Institutional accounts.
4. Enter either;
o The patient's name, or
o The institution's 'Payer Code' (or part thereof)
5. Click
Search
If an exact match is not found the following window appears, allowing
you to search for a match. The following example is for Institutional
Payers.

Once you have located the correct patient/institution, click Select
6. The
Receipt window
appears.

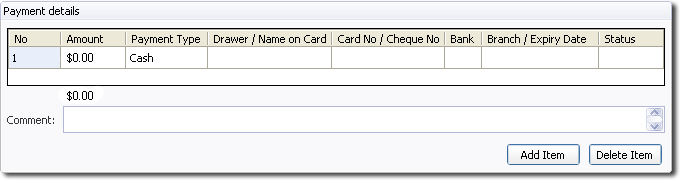
The upper section of this window (Payment Details) allows you to
indicate the types of payments made to pay the account. In the
example above, three part-payments have been made; cash, EFTPOS
and Visa.
Initially the Payment Details section
of the Receipt window is empty, awaiting your input, as shown
in the following image.
The lower section of the Receipt window (Payment Allocation) allows
you to allocate the total payment to different service items.
For a private patient account, this will display each service
item the patient needs to pay for. For institutional accounts,
this displays each service item that needs to be paid for, for
each patient the institution is responsible for. In the example
above, the patient has three service items to pay for, with only
two having had a payment allocated.
7. (Optional) Select the date on which this receipt was issued. The default is the current date.
8. Select the bank account to which this payment will be issued.
9. Enter payments.
o Each
instance of a type of payment (cash, cheque etc) must be on a
separate row (for example, paying by two different cheques would
require two different rows), indicated via the Payment Type column.
Multiple payment types are added via 
o Enter the amount of each payment in the Amount column, and any other details as necessary.
10. Allocate payments by either;
o Typing an amount directly into the Payment Allocation column for each service item being paid for, or
o Double-clicking the Payment Allocation cell. This applies the full amount owed for that service item, provided there are sufficient funds made available in the Payment Details section (Step 8, above).
11. (Optional) Indicate whether you wish to view a Print Preview of the receipt before printing, via the associated check box.
12. Indicate the number of copies of the receipt you wish to print.
13. Click Receipt and then elect to either print and save the receipt, or save it without printing.