About User Aliases
When you receive an Investigation Result from a laboratory, the result should be associated with your user name as it appears in Clinical. However, this is not always the case - sometimes the laboratory may use an alias to refer to you in its system.
Consider the scenario where a user called Dr. A Practitioner receives results for multiple aliases that include 'Dr. A Practitioner', 'A. Practitioner', 'Dr. Anthony Practitioner', and 'Dr. Tony Practitioner', depending on which laboratory the results have come from. Determining which results are associated with which practitioner record in Clinical can be confusing, particularly if your database contains multiple users who have the same or similar names.
To account for this, Clinical provides a facility for managing these user aliases. This tool allows you to;
o Link one or more aliases with your user name in Clinical.
o Automatically assign all results for these aliases with your user name when the Holding File is next opened.
o Manage any alias-to-user links you have established.
Linking Aliases with your User Name
The following example describes how to link aliases to a specific user from your Clinical database. The user in this example is Dr A Practitioner, and he is currently logged into MedicalDirector Clinical.
1. From the Clinical front screen select Correspondence > Check Holding File. The Check Holding File window appears.
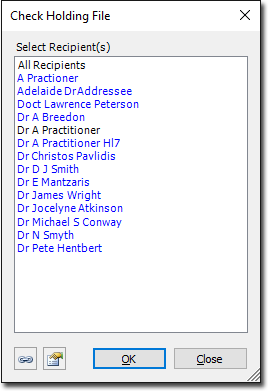
o This list displays every user associated with results currently in the Holding File.
o Names that appear in black font represent known users from your Clinical user database.
o Names that appear in blue font represent aliases that are available to be associated with your user name.
In the example above we can see that there is at least one result for Dr A Practitioner - a user from our database. We can also see that there are results for aliases of 'A Practitioner' and 'Dr A Practitioner HL7'. In the steps following we will link the two aliases with the user record of Dr A Practitioner.
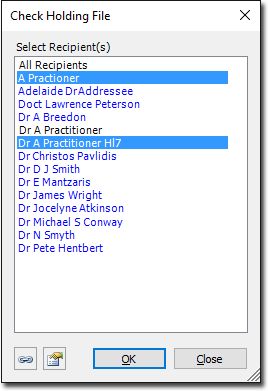
2. From the list of available aliases , select one or more to associate with your user name.
3. Click  You will be prompted to confirm this action.

4. Click Yes to confirm. The list is names is refreshed. Note in the example below that the aliases selected in Step 2 are no longer available for selection because they have been linked to the record of the user currently logged in ('Dr A Practitioner').

5. (optional) If at this time you clicked OK on this window, you would be presented with the Holding File, and any investigations results associated with the aliases you linked to your user name would now be automatically assigned to you, saving you having to manually link each result.
Managing Aliases / Breaking Aliases / Linking Aliases to Other User Names
As well as providing a quick method for linking aliases with your user name, Clinical provides a facility for linking aliases to other users. Furthermore, you can use this facility to break the link between a user name and the aliases associated with it, if required.
You may find it necessary to break the link between your user name and an alias your laboratory has used, if for example you had accidentally linked an alias with your user name when it actually related to another user in your database.
In the following scenario, Dr. Anthony Practitioner has linked his user record with three aliases; 'DR A PRACTITIONER HL7', 'A PRACTITIONER', and 'DR T PRACTITIONER'. He then discovers that the latter alias (DR T PRACTITIONER) appears twice in the Holding File;
o One instance comes from a laboratory called Better Health Labs who refer to him in their database as "Tony" instead of "Anthony".
o The other instance comes from Aus Pathology Services, and relates to another user at the same practice, Dr. Tony Practitioner. Dr. Anthony Practitioner now needs to break the link he had established between his user name and Tony's alias.
1. From the Clinical front screen select Correspondence > Check Holding File. The Check Holding File window appears.
2. Click  The Manage User Aliases window appears.

Note the following information regarding the example above:
o Dr. Anthony Practitioner is currently linked with the following laboratory aliases;
• DR A PRACTITIONER HL7
• A PRACTITIONER
• DR T PRACTITIONER
o This last laboratory alias (DR T PRACTITIONER) appears twice;
• One instance relates to results sent from a laboratory called Better Health Labs.
• A second instance relates to results sent from a laboratory called Aus Pathology Services.
o In this scenario, Dr. Anthony Practitioner needs to break the link between his user name and the alias 'DR T PRACTITIONER' for the laboratory Aus Pathology Services.
3. Locate and select the alias-sender/provider-username combination you wish to break the link for.

4. Click  You will be prompted to confirm this action.

5. Click  to confirm. The Manage User Aliases window is refreshed.

Now that the link has been broken, note the following information regarding the example above:
o The alias of DR T PRACTITIONER for the sender/provider Aus Pathology Services is no longer linked with the user name Dr Anthony Practitioner.
o Now that this alias-sender/provider combination is no longer linked with a user name it is available to be;
• Linked to 'me' (i.e. the user currently logged in).
• Linked to Other (another user).