This document will guide you through moving your Clinical and/or Pracsoft data to a new Server computer. It has been divided into 3 manageable sections; Old Server, New Server, Workstations.
If at any stage you encounter any errors please contact MedicalDirector Customer Service on 1300 300 161. This guide only covers the installation and moving of MedicalDirector-related data and components.
You may need to install other third-party software such as that used for downloading pathology results. If you require assistance with these products, please contact your System Administrator.
Before You Begin
Please contact your System Administrator if you need assistance with the following:
o External hard drive or other media for moving the data from the old server to the new server
o Ensure you have the latest full Clinical/Pracsoft disc/ISO release
o Ensure you have logged into Windows with local Administrative privileges
o Your MedicalDirector Pracsoft Store password, or Medicare Australia Location Certificate disc and PIC Passphrase
o If you participate in MedicalDirector GPRN you will need the MedicalDirector GPRN Installer.
o If you use a Secure Message Delivery (SMD) service, please contact your provider for assistance with reconfiguring the service.
o If you receive investigations results electronically, please contact your provider for assistance with reconfiguring the service.
Determine your installed version of MedicalDirector Clinical/Pracsoft
1. Open Clinical or Pracsoft
2. Select Help > About, and note the Installed version
Determine your installed version of the MDref drug database
1. Open Clinical.
2. Select Resources > What’s New in MDref, and note the Month (which indicates the installed version).
|
|
If the old server is to become a workstation please consult the guide ‘Converting a Server into a Workstation’. |
On the Old Server
Turn off Scheduled Document Import (SDI)
1. Open MedicalDirector Maintenance.
2. Select Database Tasks > Clinical.
3. Run the Manage Communications utility.
4. Within the Manage Communications utility, set Import Database to ‘Disabled’.
Clear the MD Exchange Registration
1. You will need to contact MedicalDirector Customer Service on 1300 300 161
2. Provide the Old Server Name and New Server Name
Backup the MedicalDirector Data
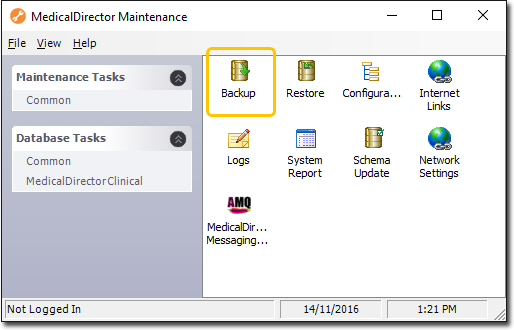
1. Open MedicalDirector Maintenance
2. Select Maintenance Tasks > Common
3. Run the Backup utility.
Copy the HCN backup to External Media
o Copy the HCN Backup to an external drive
o Default backup location is C:\HCN\Backups.
Backup the HIC.PSI (Pracsoft users only)
1. Copy the hic.psi file to the external drive (Pracsoft users only)
2. Default installed location;
o 32 Bit OS - C:\Program Files\Common Files\ PKI
o 64 Bit OS - C:\Program Files x86\Common Files\PKI
On the New Server
Install Clinical/Pracsoft
1. Install the software using the latest full version release disc/ISO.
2. Apply any application updates to match the current version installed on the workstations.
o As determined in the ‘Before you Begin’ section above.
o Update via MedicalDirector Automatic Update, or by downloading from the MedicalDirector website.
3. Apply MDref updates to match the workstation’s current MDref version.
o As determined in the ‘Before you Begin’ section above.
o Update via MedicalDirector Automatic Update, or by downloading from the MedicalDirector Website.
Please Note: If the installed version is no longer available for download via MedicalDirector Automatic Update or from the MedicalDirector website, you will need to update the server and workstations to the current version, manually.
Restore the HCN Data
1. Copy the backup from the external media to the local machine.
2. Open HCN Maintenance.
3. Select Maintenance Tasks > Common.
4. Run the Restore utility.
For Sites Where You Have to Restore Manually
1. Open Maintenance
2. Select Maintenance Tasks > Common
3. Open the Backup utility.

4. Press the  button next to Database Name.
5. From the list that appears, choose the database that requires SQL Logins to be repaired/reported on.
o Note: To repair HCN_CONTENT database, "HCN_CONTENT" without quotes will need to be typed into the database field.
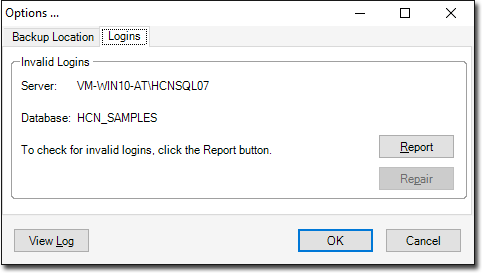
6. Click  The Options window appears.
7. Select the Logins tab.

8. Click 
o If there are any SQL login's to repair, the Repair button will become active and the message text will change. "X invalid logins were found and require attention. Click the repair button to fix the logins". Click the repair button to fix the logins
o Note: if any errors are experienced during the reporting of invalid logins, please contact MedicalDirector Customer Service.
9. Repeat steps 4-9 for all databases that require their SQL Logins to be checked.
Reset the Manage Ezy Paths
1. Open HCN Maintenance.
2. Select Maintenance Tasks.
3. Run the Configuration utility.
4. Within the Configuration list, select your ‘Live Data’, and then;
o For v3.14 and later: Click the Update button, and then when prompted click the Use UNC Path button.
o For v3.12 and earlier: Select the ManageEzy tab. Click the Update button, and then when prompted click the Use UNC Path button.
Restore the Pracsoft HIC.PSI (Pracsoft users only)
Copy the hic.psi file from the external media to the following location;
o 32 Bit OS - C:\Program Files\Common Files\ PKI’
o 64 Bit OS - C:\Program Files x86\Common Files\PKI’ if 64
Configure Schedule Document Import (SDI)
1. Open HCN Maintenance
2. Select Database Tasks > Clinical
3. Run the Manage Communications utility
4. Set the Import Database to HCN Live Data
5. Setup Data Transfer tab, ensure the following are ticked for SDI and Manual
o MD Messages
o MDX
o MD Directory
You may need to setup more configurations in the future once your pathology software is installed.
Register MD Exchange
This can be completed when opening Clinical, or
1. Select Tools > MD Exchange > Register for MD Exchange
2. Follow the prompts to complete the registration
Configure Pracsoft for Online Claiming
1. Open Pracsoft. If you are presented with errors regarding online claiming, click OK to these.
2. Within Pracsoft select Setup > Workstation Settings.
3. Select the Online Claiming tab.
4. Click the ellipse button and browse to the location of the hic.psi on the New Server.
5. Select Save > Close and reopen Pracsoft. Pracsoft should now open without errors. If you are presented with any error, please contact MedicalDirector Customer Service on 1300 300 161.
On the Workstations
Update the Workstation Configuration
1. Open HCN Maintenance
2. Select Maintenance Tasks
3. Run the Configuration utility
4. Select Live Data. You should receive an error. Click OK to the prompt.
5. Change the following:
o Database server: New Server Name\HCNSQL07
o MD Plus Server ESP Server: New Server Name\ESP
o Document Server: \\New Server Name\ManageEzy\
6. Update the ManageEzy Configuration;
o For v3.14 and later: Click the Update button.
o For v3.12 and earlier: Select the ManageEzy tab, and click the Update button.
7. Open Clinical and ensure you are able to view and save letters and documents.
Repeat the above steps for HCN Sample Data
Please Note: If the New Server Name does not appear in the drop down box, you may need to turn off any Antiviral or Firewall Software on the server, then contact HCN Customer Service on 1300 300 161 to obtain a copy of the ‘Environmental Configurations for MedicalDirector Software’.
Configure Pracsoft for Online Claiming
1. Open Pracsoft. If you are presented with errors regarding online claiming, click OK to these.
2. Within Pracsoft select Setup > Workstation Settings
3. Select the Online Claiming tab
4. Click the ellipse button and browse to the location of the hic.psi on the New Server
5. Select Save > Close and reopen Pracsoft. Pracsoft should now open without errors. If you are presented with any error, please contact MedicalDirector Customer Service on 1300 300 161.
Repeat the above on all workstations.
