This guide is intended to assist you in quickly becoming familiar with Pracsoft’s core functionality.
It is important to note before exploring this guide, that;
o This guide is a high-level overview, and merely compliments the in-depth online Help.
o You have already configured Pracsoft for first-time use.
Should you require further assistance relating to your Pracsoft software, please contact MedicalDirector Customer Service.
What This Guide Covers
o How to create new patient records, including how to record families.
o How to create an Appointment Book, and then how to populate it with your practitioners from Pracsoft.
o How to schedule an appointment for a patient.
o How to add patients to Pracsoft’s Waiting Room (an on-screen representation of your Practice’s waiting room).
o How to record a visit (issue an account).
o How to batch and send bulk claims to Medicare / Veterans’ Affairs.
Adding Patient Records
If you run Pracsoft in conjunction with MedicalDirector Clinical, add new patients via Pracsoft only; patients added this way are transferred to Clinical automatically.
Adding New Patient Records
1. Either click the Add New Patient button ![]() or press F6. The Add New Patient window appears.
or press F6. The Add New Patient window appears.
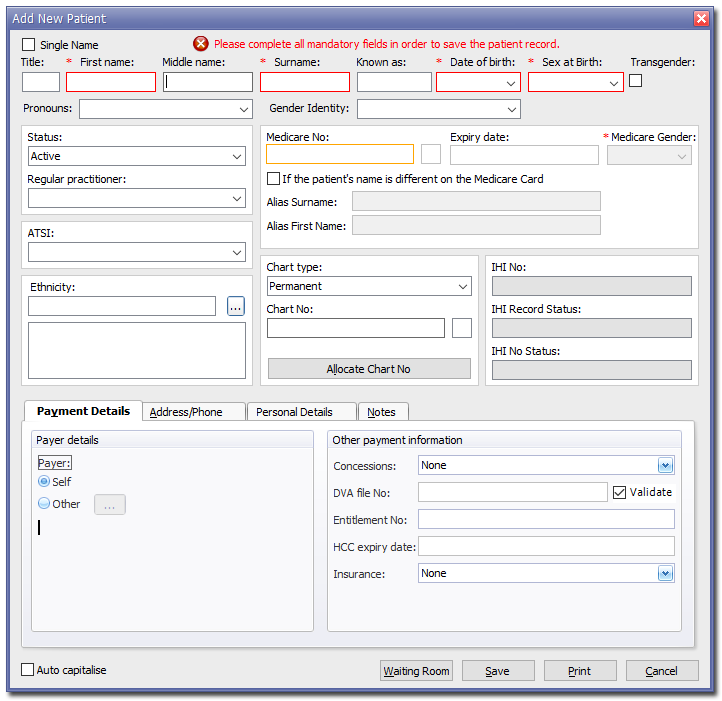
2. Enter the patient's information, ensuring to include their Medicare/DVA number if available. If you discount or bulk bill pensioners or health card holders ensure you select their concession type.
3. Click  to confirm the information and close the window. When you click the Save button, you are presented with the Referral Details window. You may enter any referral information applicable to the patient concerned if desired.
4. It is recommended that you now validate their IHI Number. Press F2 to search for the patient you just created, select them and click  Their details window is presented. Locate and click
Adding Family Records
A ‘family’ consists of a group of two of more patients, where one patient is designated the payer for all in the group.
1. Create the ‘payer’ patient record first (follow the steps above for Adding New Patient Records).
2. When adding subsequent family members, enter their First Name and Surname into the Add New Patient window.
3. On this same window, locate the Payer Details section and select ‘Other’. The Select Payer for [patient name] window appears, pre-populated with patients with the same surname.
4. Locate and select the patient who will act as the ‘payer’. You are not restricted to select from the list of patients with the same surname; you can search for any other patient you desire.
5. Click to confirm. You are returned to the Add New Patient window, now populated with the demographic details of the payer.
Scheduling Appointments
1. Open the Appointment module by clicking the ![]() button.
button.
o If you have multiple Appointment Books, select one via the associated drop-down list at the top of the window.
2. Select the practitioner for whom you wish to assign an appointment, using the associated drop-down list.
3. Click a time slot in the date/time matrix. The insert point appears within the time slot, ready for you to begin typing a patient's name. Alternatively, click and drag across multiple time slots, to schedule longer appointments.
4. Enter the patient's name in the format of ‘Andrews, John’ or ‘John Andrews’. Press ENTER to confirm.
o If there is more than one matching patient, the Select Patient window appears for you to select from.
o If this is a new patient, the Select Patient window appears. Click  This creates a new appointment for the patient even though you don't have a record for them in the Pracsoft database. Later you can create a record for them, and then link their Appointment Book entry to the new record.
5. Click The patient's appointment has been scheduled. You can indicate the type of appointment by right-clicking the appointment entry and selecting Type from the menu that appears.
Adding Patients to the Waiting Room
The Waiting Room is where you track the movements of patients in your actual waiting room at your Practice.
1. From the tabs available along the top of the Waiting Room window, indicate which practitioner you wish to assign the patient to
o The default is ‘All’.
o A practitioner’s designated tab is represented by their User ID.
o By selecting a specific practitioner's tab, the patient will be assigned to that practitioner regardless of the patient's default practitioner.
o If the ‘All’ tab is selected, the patient will be assigned to their default practitioner.
2. To add a patient to the Waiting Room, press F3.
3. Enter the patient’s Surname, Medicare Number or Chart Number in the text box at the top of this window. As you type, a list of patients appears in the lower section of this window, generated dynamically. When searching for a patient by Medicare Number, you must enter the full number before the list is populated.
4. Double-click the patient record to add them to the Waiting Room list. If you wish to perform an Online Patient/Veteran Verification check, select the patient and click the OPV/OCV Check button (only available if you are using online claiming).
Recording Visits (Issuing Accounts)
The following procedure describes the steps necessary for billing a bulk bill account. You can also bill to other types of accounts such as Private and Institutional accounts, and you can bill to multiple patients for example. See Recording Visits for detailed instructions.
1. Within the Waiting Room, select the patient's record, and press F5. The Record Visit window appears.

2. As you are issuing a Bulk Bill account, select Bulk Bill from the Invoice To drop-down list.
3. If necessary;
o Select the consulting practitioner from the Seen By drop-down menu.
o Select the referring practitioner (if required) via the Referral button at the bottom of this window.
o Indicate the location at which the consultation took place from the Location drop-down menu.
o Modify the Consult Time/Date if required. This refers to the recording of the visit, not the consultation time.
4. Add and/or modify Service Item details;
o A list of Service Items is available via File > Search Std Item List (or press Ctrl+S).
o Add service item text via the Text column for each item, if desired.
o A maximum of 14 Service Items (including Incentive Items) may be billed simultaneously. If you need to record further items, you must initiate another visit for the patient.
5. (Optional) Tick the In Hospital check box to indicate that the service was conducted in-hospital. Upon ticking this box a new drop-down list becomes available where you must select the Provider No (Facility ID).
6. Indicate whether the patient is removed from the Waiting Room, via the associated check box.
7. Indicate whether you want to print a voucher via the Print Voucher check box. You might disable this if for example you need to edit the voucher, or perhaps you have printed them a voucher already (on a blank DB4) and are now billing the patient. Specify how many copies you wish to print.
8. Click  to initiate the claim. If you have enabled Online Patient Verification (OPV), and the patient in question has not had their Medicare card details recorded, you will be prompted to enter their details now. If you have their Medicare card handy, swipe it now to automatically enter their card number.
Batching Bulk Claims for Medicare / Veterans’ Affairs
After recording a visit / issuing an account to Bulk Bill or Vet Affairs, you must batch all the claim vouchers before they can be sent to Medicare Australia / Vet Affairs for processing. The following information explains the process of batching claims for both Bulk Bill and Vet Affairs claims.
1. Select Processing > Batch Bulk Claims > Medicare (or Veterans Affairs)
2. The Batch Bulk Claims window appears.
o MedicalDirector Pracsoft calculates the number of claims required for vouchers that are not already batched.
o Details of individual claims are shown on the right-hand side of the window.
o Summary details are on the left-hand side. If there are multiple batches available, you can view them by clicking the forward(right) or backward(left) arrow button, or by pressing the PAGE-UP or PAGE-DOWN keys on your keyboard to scroll through the list.
o Each batch must have a claim number. Enable auto-claim number generation to ensure you do not accidentally use the same batch number twice (see Global Settings).
o Any in-hospital vouchers are automatically batched into a separate claim prefixed with #, for example #1234.
o Check that the vouchers for each batch match up with Pracsoft's details of the vouchers. To display a list of the un-batched vouchers proposed for that claim press ALT+S. If you discover errors in a claim, you must close the Bulk Claim Details and Batching Bulk Claims windows, and edit the voucher before you can proceed with batching.

3. Click  to process the batch. You will be prompted to confirm this action. Upon successfully processing a batch, the Batching Bulk Claims window will indicate that the batch has been processed, and the Process button will no longer be available for this batch.
4. Use the forward(right) or backward(left) buttons to scroll through the remaining batches, and process them as desired.
5. Once you have completed processing batches, you can either;
o Click  to send the batch now, or
o Click  to save the processed batches, for sending in bulk at a later time.
Sending Bulk Claims to Medicare / Veterans’ Affairs
There are 5 steps to sending claims to Medicare Australia Online.
Step 1 - Selecting Claims
1. From the Pracsoft Waiting Room, select Processing > Online Claiming. The Medicare Australia Online Claiming widow appears.
o The left-hand side displays claims that have been batched but not prepared/transmitted. The right-hand side displays claims that have been prepared/transmitted. Move claims from side-to-side by double-clicking them.
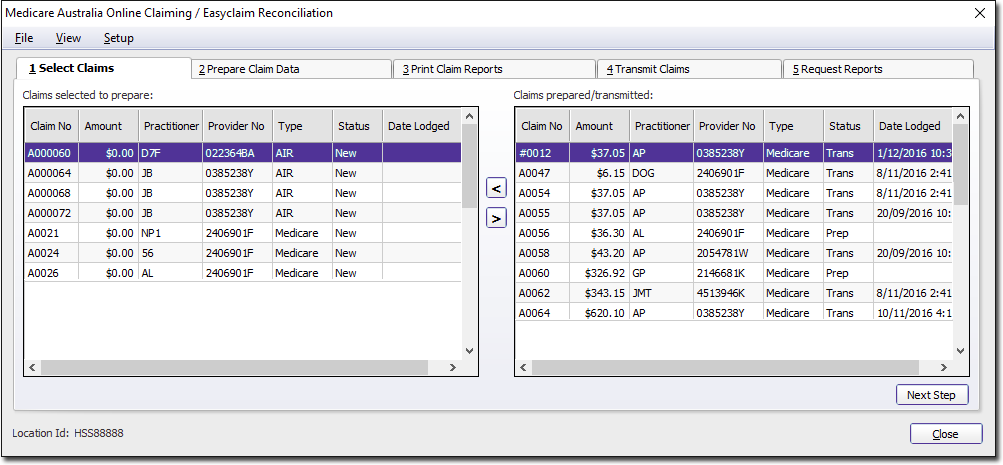
2. Once you have placed the claims you wish to prepare into the 'Claims Selected to Prepare' section, click  The Prepare Claim Data tab will be displayed.
Step 2 - Preparing Claim Data for Transmission
The Prepare Claim Data tab displays claims that you have selected to prepare. If necessary you can edit a voucher here before you process it.
1. Click  to begin preparing vouchers.
2. You will be prompted to double-check that the correct claims have been selected for processing.
o If you are using a location certificate only and the Practitioner for whom you are preparing the claim on behalf of does not use an individual token, the claim will process once you respond with 'Yes'.
o If you are preparing claims for a Practitioner who uses an individual token, the Practitioner must insert the Individual Token or iKey and type in the password for each Practitioner when prompted.
o If a claim has been prepared successfully you will be notified in this window.
o Any issues discovered are displayed in this window.
o If a claim has failed preparation, take note of the reasons displayed and then click the Edit button to call an edit window in which you can make the appropriate changes. Once any errors with the claim are rectified, proceed to the Medicare Australia Online Claiming window via Processing > Online Claiming and attempt to process the claim(s) again. The procedure for rectifying issues with immunisations claims is different.
3. Once all claims have processed successfully click The Print Claim Reports tab will be displayed.
Step 3 - Printing Claim Reports
Here you can print claim reports. No documents are required to be sent to Medicare Australia for Medicare and DVA claims. However, you may wish to print Medicare Australia Online Claiming claims for your own records. Click to continue. The Transmit Claims tab will be displayed.
Step 4 - Transmitting Claims
1. Click ![]() to transmit the claims. The Transmit Claims window appears.
to transmit the claims. The Transmit Claims window appears.
o One or more claims can be transmitted to Medicare Australia using an Internet connection.
o The transmission of claims does not need to be performed at the same time as the claims are prepared. These processes are separate. It is recommended that you transmit prepared claims so that in Step 1 you can accurately distinguish between sent and un-sent claims (refer to Step 1 - Selecting Claims for clarification).
o All claims prepared but not transmitted should have a tick in the box next to the claim number. If you decide at this stage that you do not wish to send one of these claims simply remove the tick from the box and transmit at a later time.
o The Cancel button allows you to close this window without transmitting any claims. You can then return to this step at a later time (without preparing these claims again) to recommence the transmission.
2. When you are sure you wish to transmit the selected claims click ![]() A message appears in both the main window and the hiconline.log to indicate the success or failure of the transmission. At this stage you have completed the steps necessary for sending bulk claims to Medicare Australia Online. You need only proceed to Step 5 - Requesting Medicare Australia Online Reports if you wish to request Processing Reports (for resolving exceptions) or Payment Reports from Medicare.
A message appears in both the main window and the hiconline.log to indicate the success or failure of the transmission. At this stage you have completed the steps necessary for sending bulk claims to Medicare Australia Online. You need only proceed to Step 5 - Requesting Medicare Australia Online Reports if you wish to request Processing Reports (for resolving exceptions) or Payment Reports from Medicare.
Step 5 - Requesting Medicare Australia Online Reports
You can send a request to Medicare to return processing and payment reports, which help you to resolve exceptions. Click  to request claim reports from Medicare Australia Online Claiming.
o Any claims that have exceptions will have reports printed and must be resolved before the claim can be receipted.
o Payment reports are printed for the relevant claims and any claims that have been paid by Medicare Australia Online Claiming are automatically receipted off in your Pracsoft accounts.
o All Report output can also be found in the View Payment/Processing.
o Payment reports will not be requested at this stage for claims that have not had their exceptions resolved.
Medicare Easyclaim and Integrated EFTPOS
You can process Patient Claiming and Bulk Bill via Medicare Easyclaim using MedicalDirector’s Integrated EFTPOS facility, known as EFTPOS Auto. See Online Claiming. Information is also available via the Medicare Australia Easyclaim web site.
To take advantage of Medicare Easyclaim functionality you will require an EFTPOS terminal from TYRO. Please contact Sales on 1300 300 161 (opt 1). See Integrated EFTPOS - About and Usage.