The following information relates to creating a single appointment via the patient's record. You can also create an appointment via the Appointment Book.
1. Ensure you have opened a patient's record, and are viewing the Patient Explorer.
2. Select the Bookings margin menu item. The Patient Bookings window appears.

3. Click  The New Appointment Wizard appears.
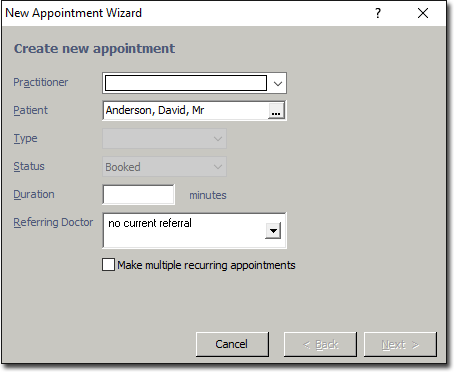
As you are recording a new booking via a patient's file, the patient's name is automatically displayed in the Patient field.
The Status field is initially disabled, with 'Booked' selected by default. This field becomes enabled when the patient arrives and the status is changed via the Waiting Room.
4. Select a Practitioner from the Practitioner drop-down list. Only practitioners recorded in Bluechip will be available.
5. Select the purpose of the booking from the Type drop-down list.
6. Enter an appointment duration time if necessary. The duration defaults to the default time recorded for the selected Practitioner, via the Appointments tab of Practitioner Setup.
7. The Referring Doctor field automatically displays the patient's most current Referral (if available) and Referring Doctor. If necessary, you can create a new referral via this window, by clicking the drop-down arrow and then clicking  on the secondary window that appears.
8. Click  to continue. The Create Single Appointment window appears.
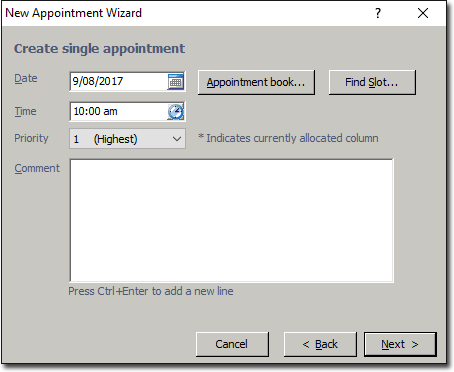
9. Enter a date for the appointment in the Date field, via one of the following methods:
o Manually enter a date.
o Select a date from the calendar by click the associated button. 
o Find a free slot in the appointment book for the selected Practitioner by clicking 
o Find a free slot in the appointment book for other Practitioners by clicking the Find Slot button.
10. Enter an appointment time in the Time field or use the clock icon to select an appropriate time 
11. (Optional) Select a priority for the booking. This is necessary only if there is a double-booking.
12. (Optional) Enter any relevant comments in the Comments field.
13. Click  You are returned to the Patient Bookings window, where the new appointment details are now available. The new appointment is also entered in the Appointment Book.